Chapter Outline:
2.0 Introduction
2.1 Securing Device Access
2.2 Assigning Administrative Roles
2.3 Monitoring and Managing Devices
2.4 Using Automated Security Features
2.5 Securing the Control Plane
2.6 Summary
Section 2.1: Securing Device Access
Upon completion of this section, you should be able to:
- Explain how to secure a network perimeter.
- Configure secure administrative access to Cisco routers.
- Configure enhanced security for virtual logins.
- Configure an SSH daemon for secure remote management.
Topic 2.1.1: Securing the Edge Router
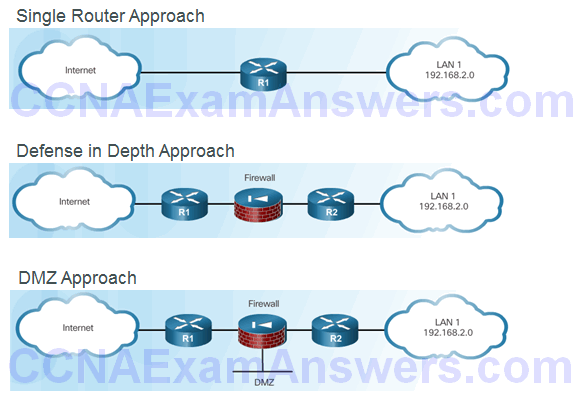
Securing the Network Infrastructure
Edge Router Security Approaches
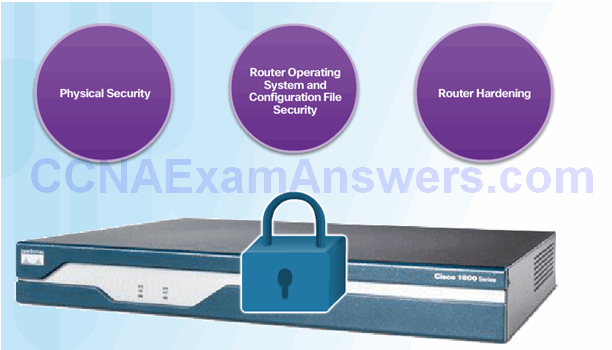
Three Areas of Router Security
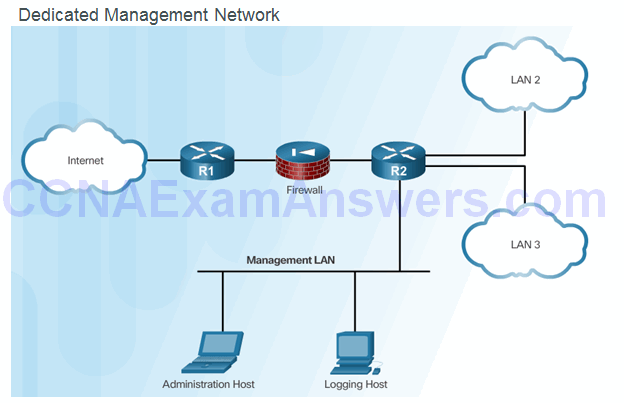
Secure Administrative Access
- Tasks:
- Restrict device accessibility
- Log and account for all access
- Authenticate access
- Authorize actions
- Present legal notification
- Ensure the confidentiality of data
Secure Local and Remote Access
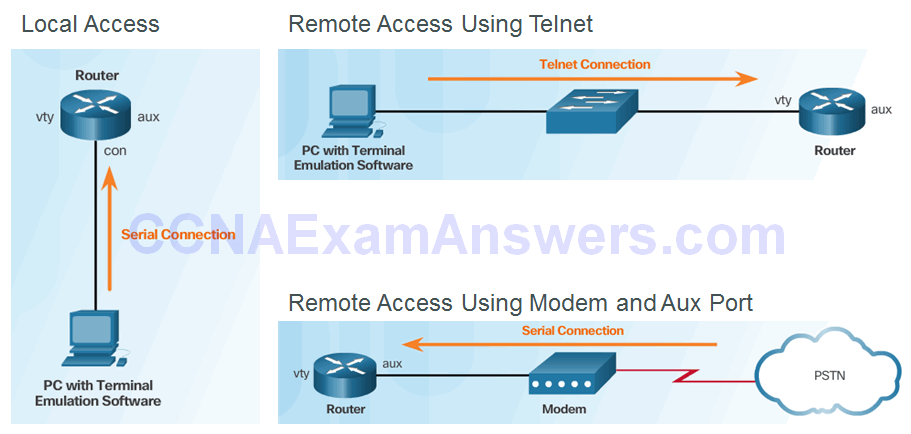
Topic 2.1.2: Configuring Secure Administrative Access
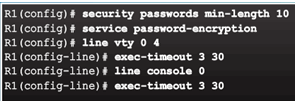
Strong Passwords
- Guidelines:
- Use a password length of 10 or more characters.
- Include a mix of uppercase and lowercase letters, numbers, symbols, and spaces.
- Avoid passwords based on easily identifiable pieces of information.
- Deliberately misspell a password (Smith = Smyth = 5mYth).
- Change passwords often.
- Do not write passwords down and leave them in obvious places.

Increasing Access Security
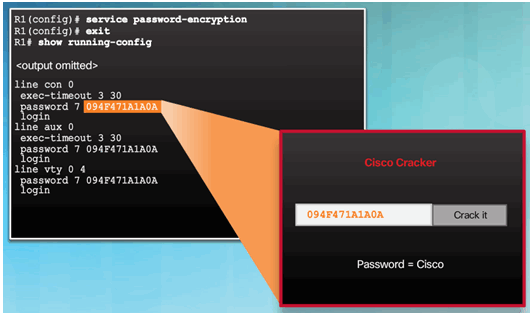
Secret Password Algorithms
Guidelines:
- Configure all secret passwords using type 8 or type 9 passwords
- Use the enable algorithm-type command syntax to enter an unencrypted password

- Use the username name algorithm-type command to specify type 9 encryption

Securing Line Access
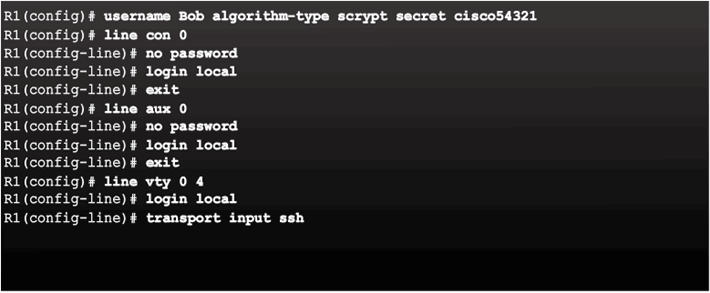
Topic 2.1.3: Configuring Enhanced Security for Virtual Logins
Enhancing the Login Process
Virtual login security enhancements:
- Implement delays between successive login attempts
- Enable login shutdown if DoS attacks are suspected
- Generate system-logging messages for login detection
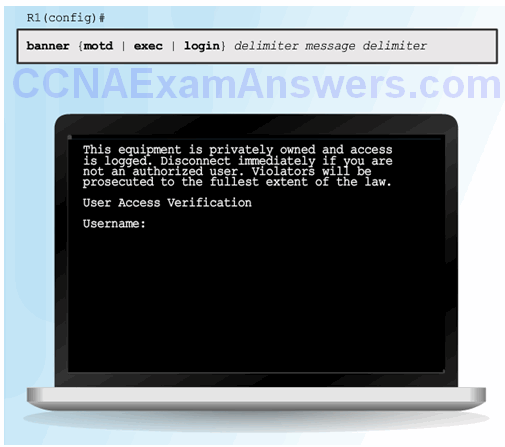
Configuring Login Enhancement Features
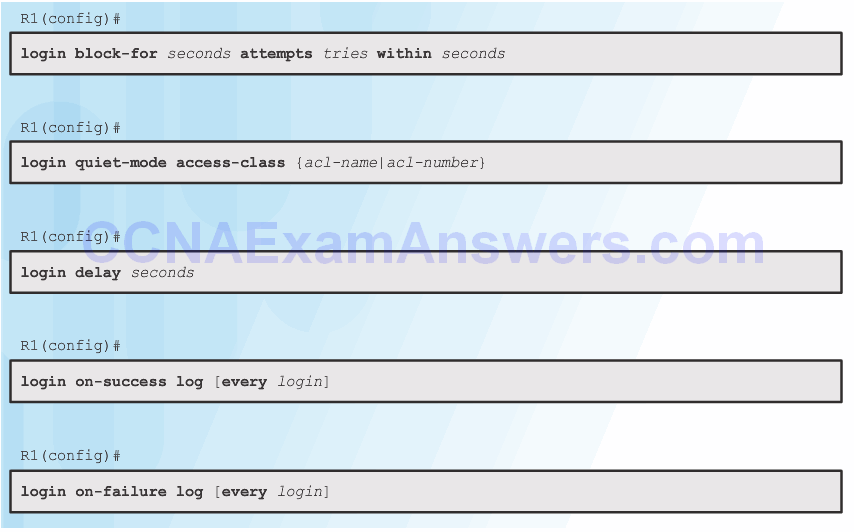
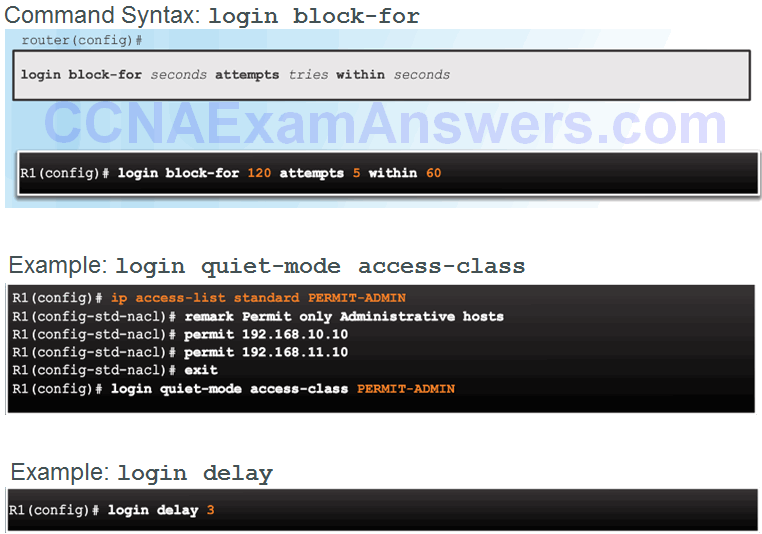
Enable Login Enhancements
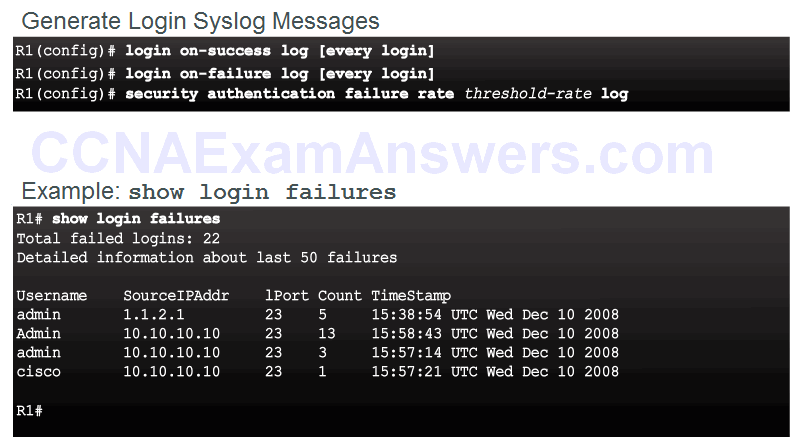
Logging Failed Attempts
Topic 2.1.4: Configuring SSH
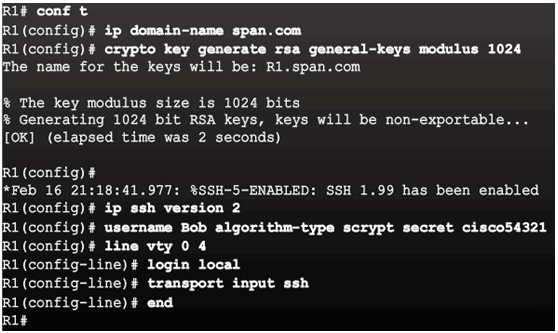
Steps for Configuring SSH
Example SSH Configuration
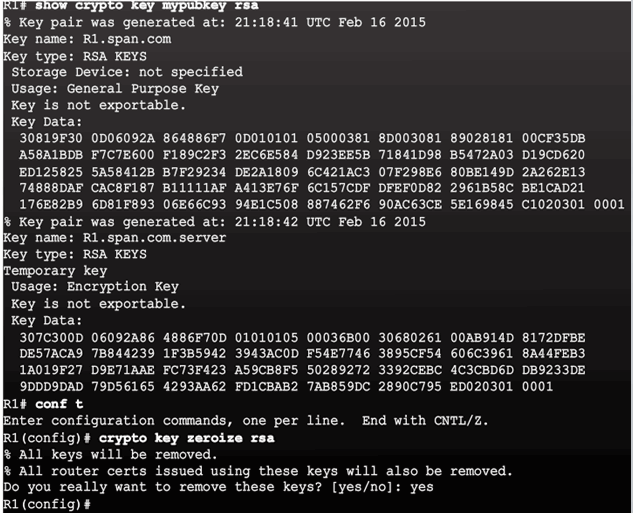
Example Verification of SSH
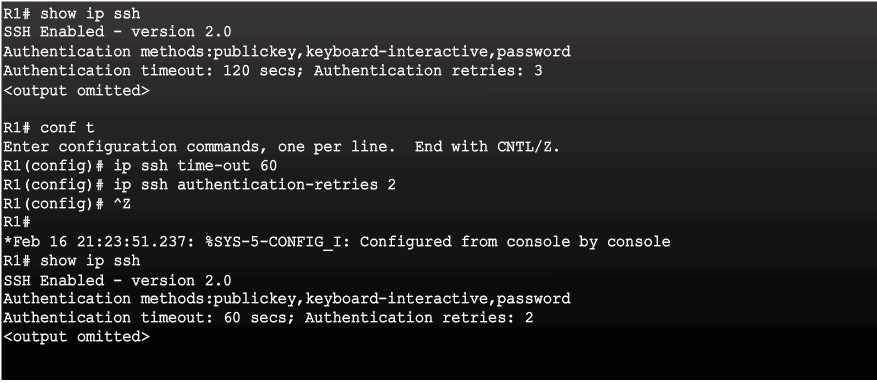
Modifying the SSH Configuration
Connecting to an SSH-Enabled Router
Two ways to connect:
- Enable SSH and use a Cisco router as an SSH server or SSH client.
- As a server, the router can accept SSH client connections
- As a client, the router can connect via SSH to another SSH-enabled router
- Use an SSH client running on a host, such as PuTTY, OpenSSH, or TeraTerm.
Section 2.2: Assigning Administrative Roles
Upon completion of this section, you should be able to:
- Configure administrative privilege levels to control command availability.
- Configure role-based CLI access to control command availability.
Topic 2.2.1: Configuring Privilege Levels
Limiting Command Availability
Privilege levels:
- Level 0: Predefined for user-level access privileges.
- Level 1: Default level for login with the router prompt.
- Level 2-14: May be customized for user-level privileges.
- Level 15: Reserved for the enable mode privileges.
Levels of access commands:
- User EXEC mode (privilege level 1)
- Lowest EXEC mode user privileges
- Only user-level command available at the router> prompt
- Privileged EXEC mode (privilege level 15)
- All enable-level commands at the router# prompt
Privilege Level Syntax
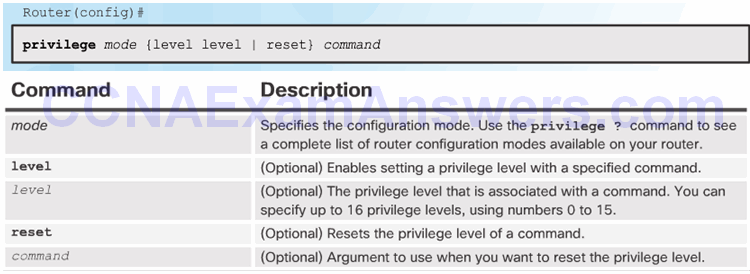
Configuring and Assigning Privilege Levels
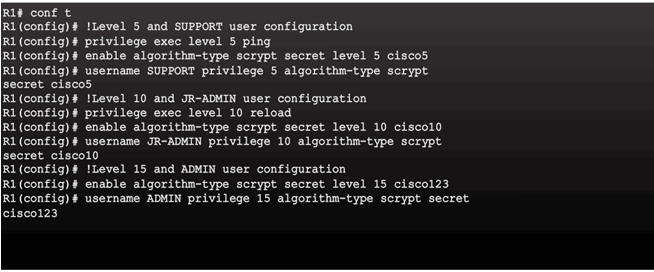
Limitations of Privilege Levels
- No access control to specific interfaces, ports, logical interfaces, and slots on a router
- Commands available at lower privilege levels are always executable at higher privilege levels
- Commands specifically set at higher privilege levels are not available for lower privilege users
- Assigning a command with multiple keywords allows access to all commands that use those
Topic 2.2.2: Configuring Role-Based CLI
Role-Based CLI Access
For example:
- Security operator privileges
- Configure AAA
- Issue show commands
- Configure firewall
- Configure IDS/IPS
- Configure NetFlow
- WAN engineer privileges
- Configure routing
- Configure interfaces
- Issue show commands
Role-Based Views
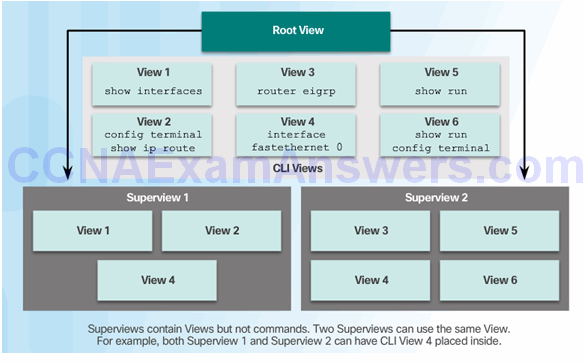
Configuring Role-Based Views
Step 1

Step 2

Step 3

Step 4

Configuring Role-Based CLI Superviews
Step 1

Step 2

Step 3

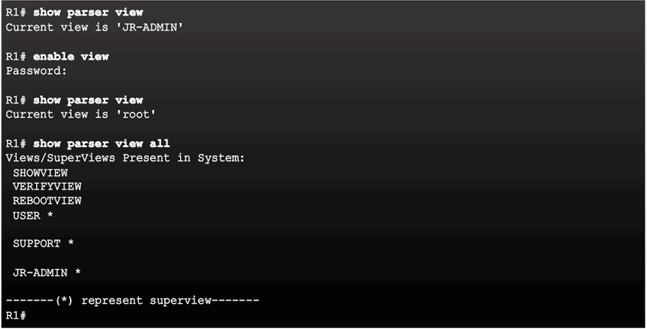
Verify Role-Based CLI Views
Enable Root View and Verify All Views
Section 2.3: Monitoring and Managing Devices
Upon completion of this section, you should be able to:
- Use the Cisco IOS resilient configuration feature to secure the Cisco IOS image and configuration files.
- Compare in-band and out-of band management access.
- Configure syslog to log system events.
- Configure secure SNMPv3 access using ACL
- Configure NTP to enable accurate timestamping between all devices.
Topic 2.3.1: Securing Cisco IOS Image and Configuration Files
Cisco IOS Resilient Configuration Feature
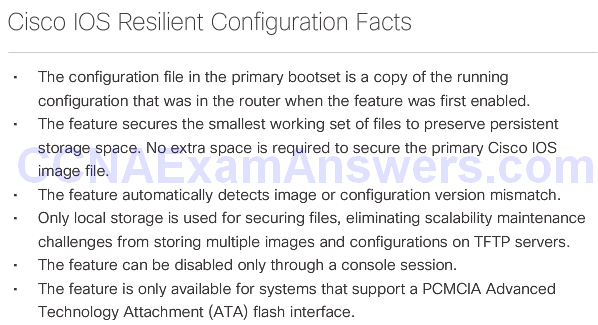
Enabling the IOS Image Resilience Feature
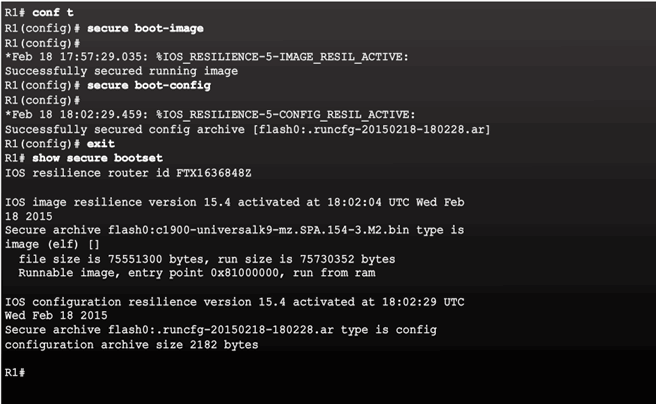
The Primary Bootset Image
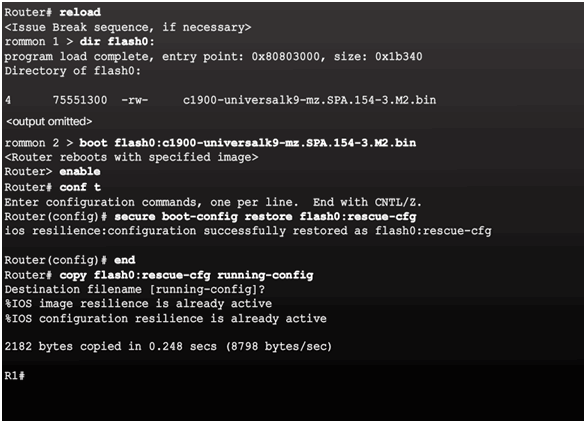
Configuring Secure Copy
Configure the router for server-side SCP with local AAA:
- Configure SSH
- Configure at least one user with privilege level 15
- Enable AAA
- Specify that the local database is to be used for authentication
- Configure command authorization
- Enable SCP server-side functionality
Recovering a Router Password
- Connect to the console port.
- Record the configuration register setting.
- Power cycle the router.
- Issue the break sequence.
- Change the default configuration register with the confreg 0x2142 command.
- Reboot the router.
- Press Ctrl-C to skip the initial setup procedure.
- Put the router into privileged EXEC mode.
- Copy the startup configuration to the running configuration.
- Verify the configuration.
- Change the enable secret password.
- Enable all interfaces.
- Change the config-register with the config-register configuration_register_setting.
- Save the configuration changes.
Password Recovery
Disable Password Recovery
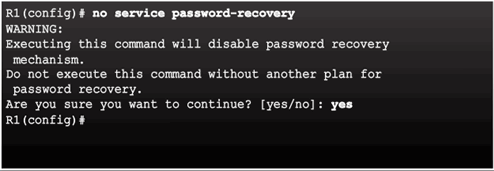
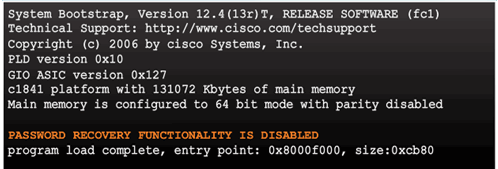
No Service Password Recovery
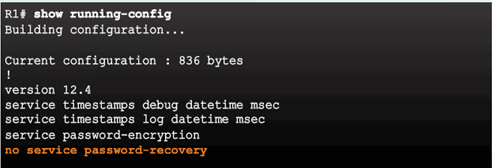
Password Recovery Functionality is Disabled
Topic 2.3.2: Secure Management and Reporting
Determining the Type of Management Access
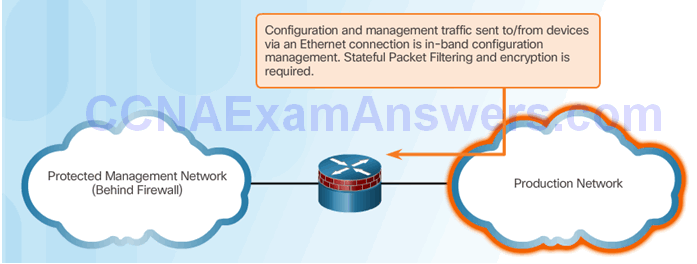
- In-Band Management:
- Apply only to devices that need to be managed or monitored
- Use IPsec, SSH, or SSL when possible
- Decide whether the management channel need to be open at all time
- Out-of-Band (OOB) Management:
- Provide highest level of security
- Mitigate the risk of passing management protocols over the production network
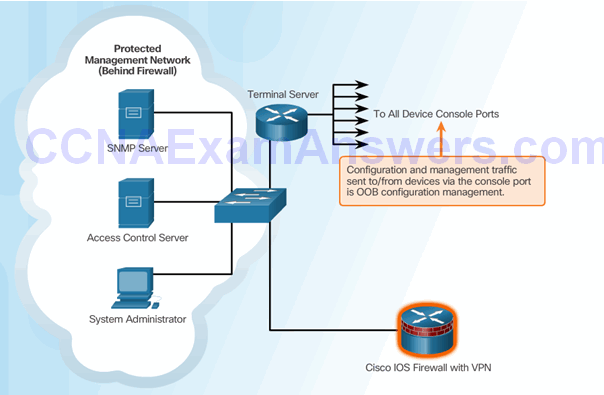
Out-of-Band and In-Band Access
Topic 2.3.3: Using Syslog for Network Security
Introduction to Syslog
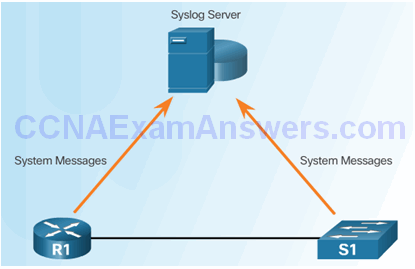
Syslog Operation
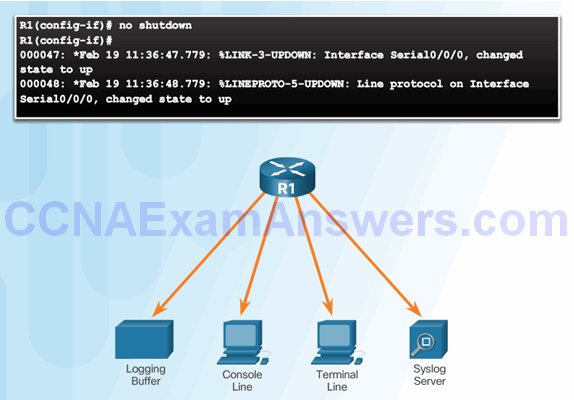
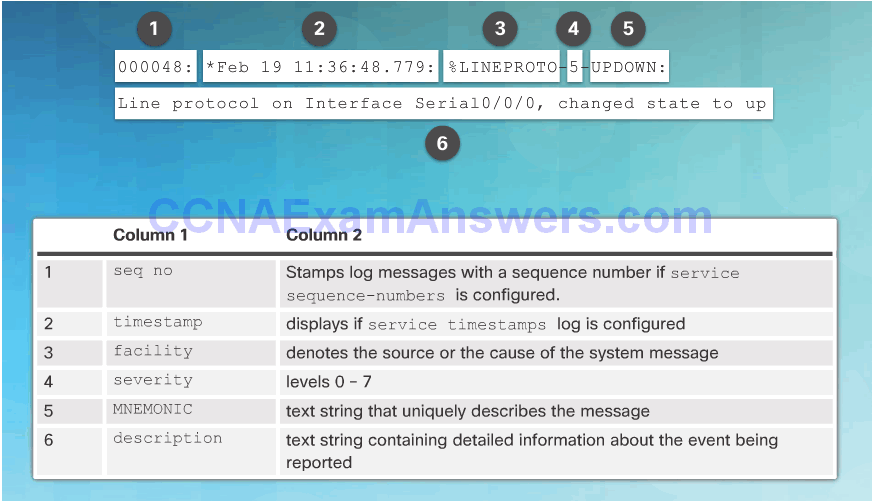
Syslog Message
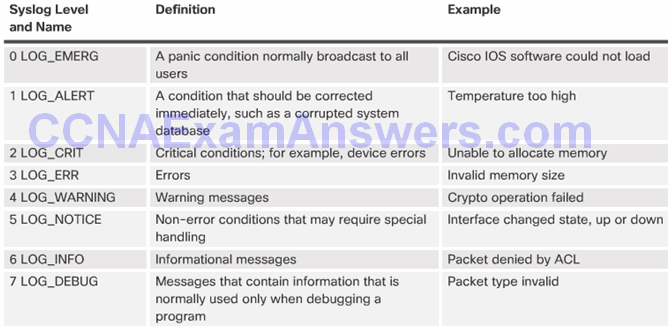
Security Levels

Example Severity Levels
Syslog Systems
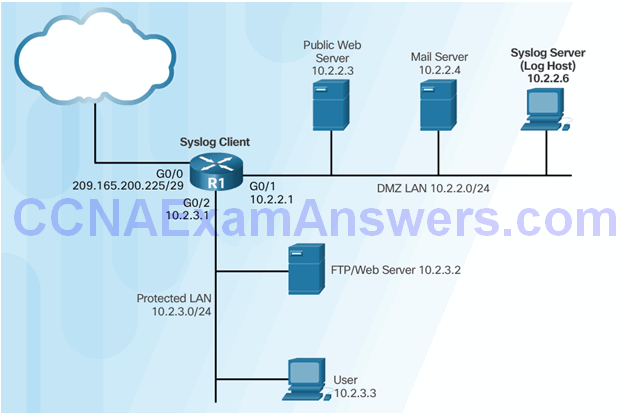
Configuring System Logging
Step 1

Step 2 (optional)

Step 3

Step 4

Topic 2.3.4: Using SNMP for Network Security
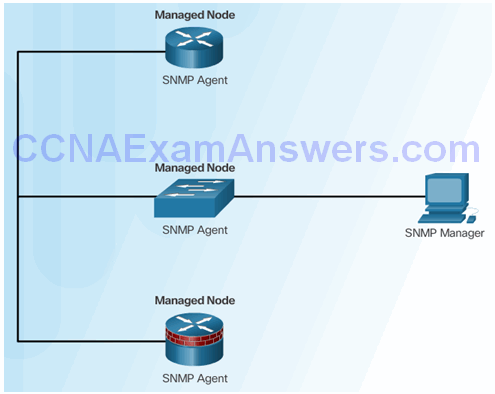
Introduction to SNMP
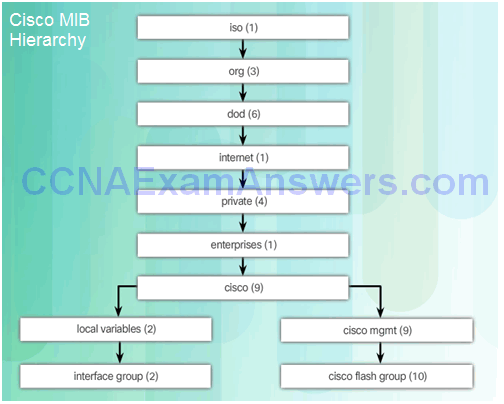
Management Information Base
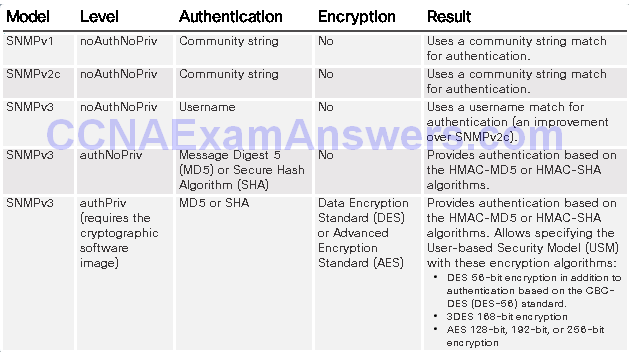
SNMP Versions
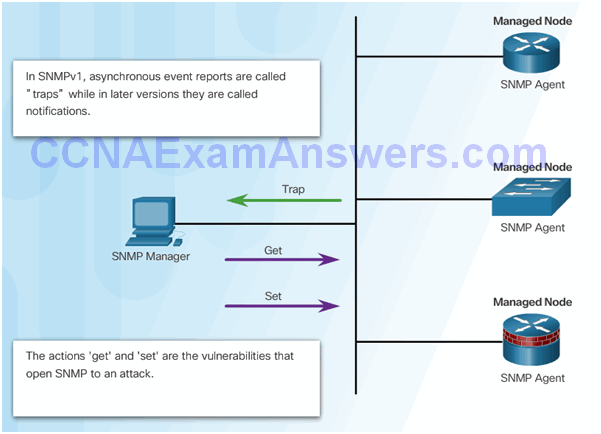
SNMP Vulnerabilities
SNMPv3
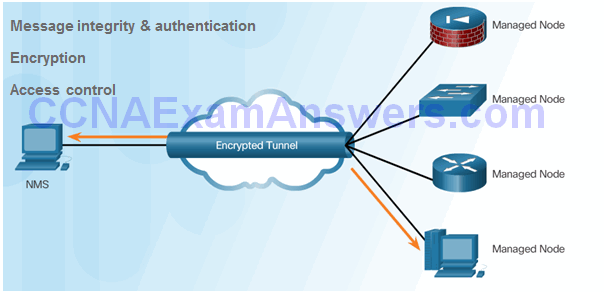
- Transmissions from manager to agent may be authenticated to guarantee the identity of the sender and the integrity and timeliness of a message.
- SNMPv3 messages may be encrypted to ensure privacy.
- Agent may enforce access control to restrict each principal to certain actions on specific portions of data.
Configuring SNMPv3 Security
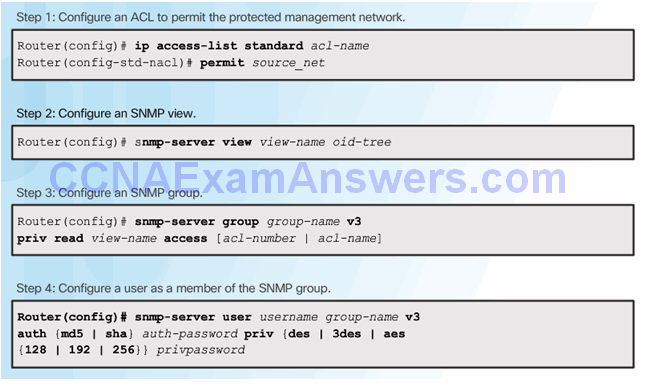
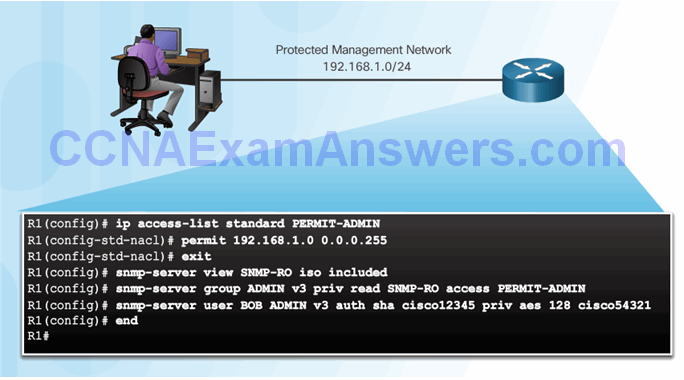
Secure SNMPv3 Configuration Example
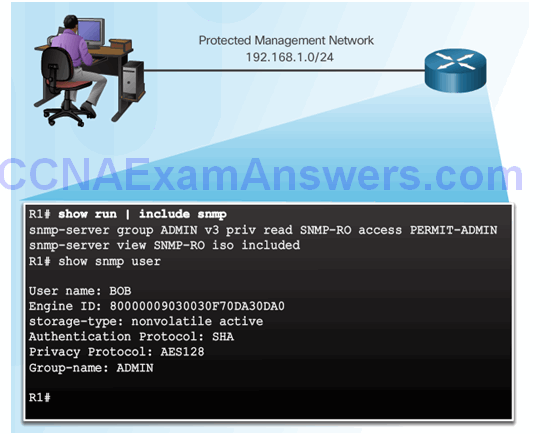
Verifying the SNMPv3 Configuration
Topic 2.3.5: Using NTP
Network Time Protocol

NTP Server
Sample NTP Topology

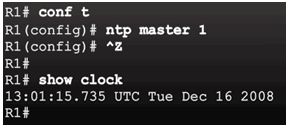
Sample NTP Configuration on R1
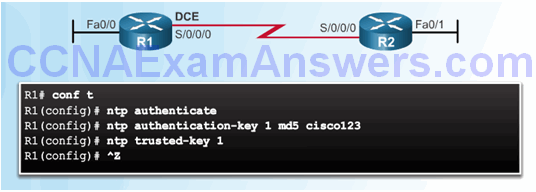
Sample NTP Configuration on R2

NTP Authentication
Section 2.4: Using Automated Security Features
Topic 2.4.1: Performing a Security Audit
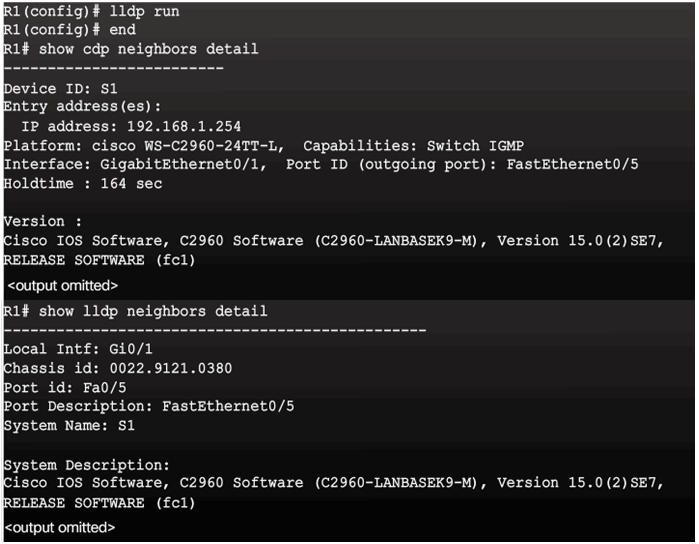
Discovery Protocols CDP and LLDP
Settings for Protocols and Services
- There is a detailed list of security settings for protocols and services provided in Figure 2 of this page in the course.
- Additional recommended practices to ensure a device is secure:
- Disable unnecessary services and interfaces.
- Disable and restrict commonly configured management services.
- Disable probes and scans. Ensure terminal access security.
- Disable gratuitous and proxy ARPs
- Disable IP-directed broadcasts.
Topic 2.4.2: Locking Down a Router Using AutoSecure
Cisco AutoSecure
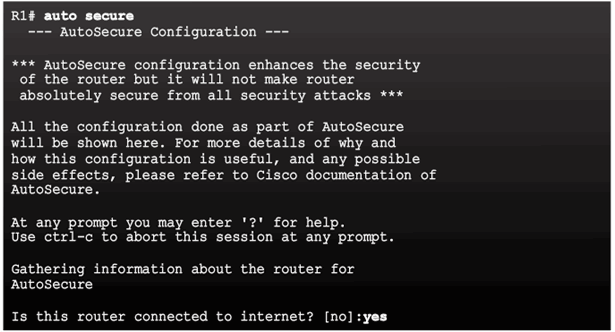
Using the Cisco AutoSecure Feature
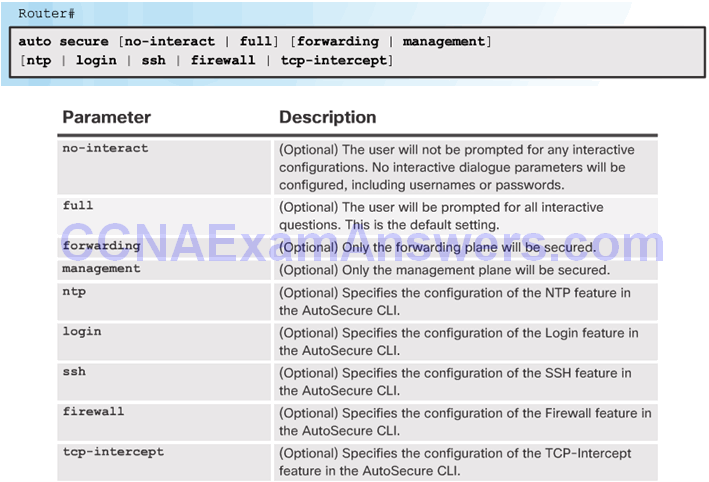
Using the auto secure Command
- The auto secure command is entered
- Wizard gathers information about the outside interfaces
- AutoSecure secures the management plane by disabling unnecessary services
- AutoSecure prompts for a banner
- AutoSecure prompts for passwords and enables password and login features
- Interfaces are secured
- Forwarding plane is secured
Section 2.5: Securing the Control Plane
Topic 2.5.1: Routing Protocol Authentication
Routing Protocol Spoofing
Consequences of protocol spoofing:
- Redirect traffic to create routing loops.
- Redirect traffic so it can be monitored on an insecure link.
- Redirect traffic to discard it.
OSPF MD5 Routing Protocol Authentication
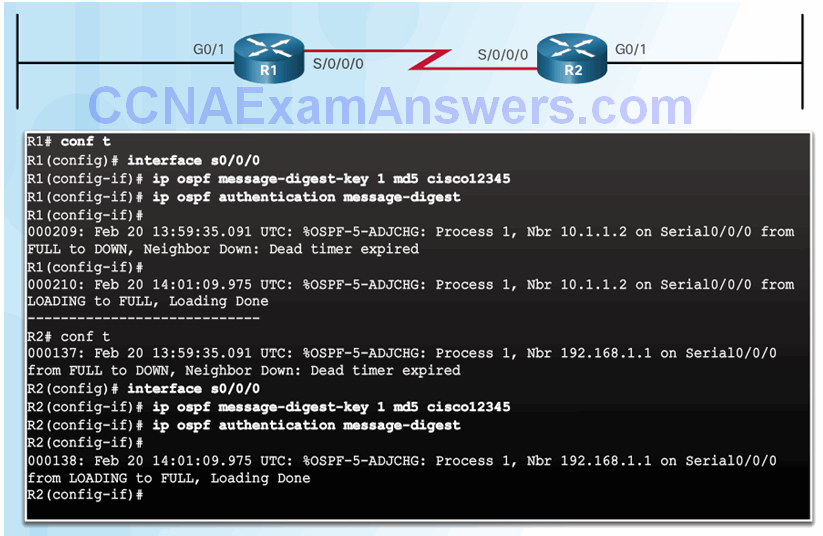
OSPF SHA Routing Protocol Authentication
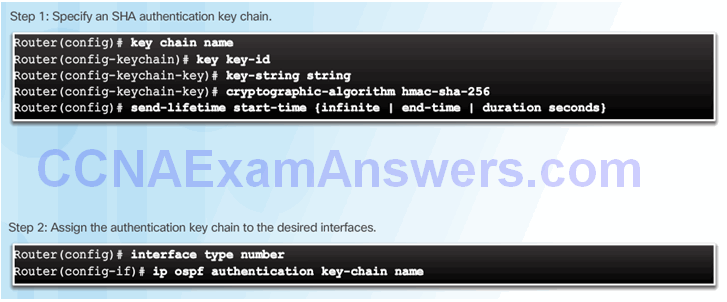
Topic 2.5.2: Control Plane Policing
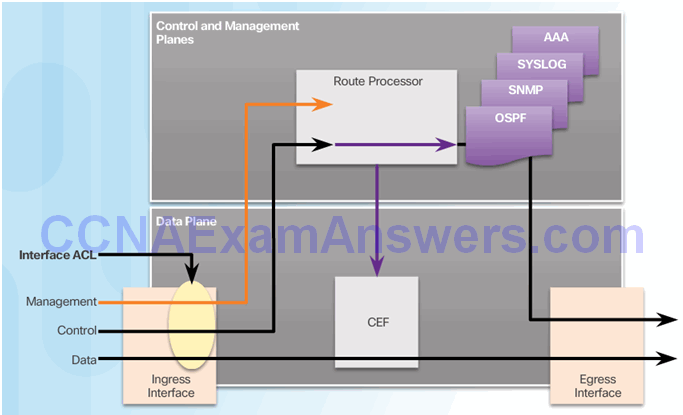
Network Device Operations
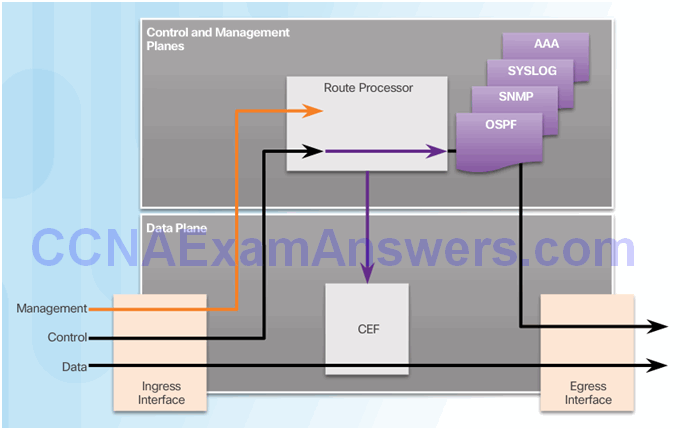
Control and Management Plane Vulnerabilities
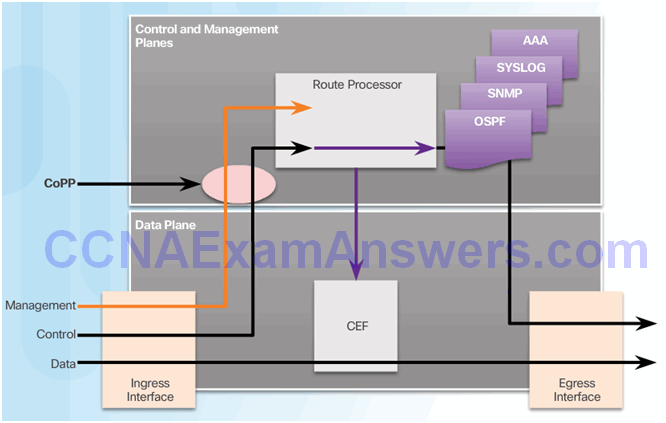
CoPP Operation
Section 2.6: Summary
Chapter Objectives:
- Configure secure administrative access.
- Configure command authorization using privilege levels and role-based CLI.
- Implement the secure management and monitoring of network devices.
- Use automated features to enable security on IOS-based routers.
- Implement control plane security.
Download Slide PowerPoint (pptx):
[sociallocker id=”2293″][wpdm_package id=’2841′][/sociallocker]
