13.2.7 Packet Tracer – Use Ping and Traceroute to Test Network Connectivity (Instructor Version – Optional Packet Tracer)
Instructor Note: Red font color or gray highlights indicate text that appears in the instructor copy only.

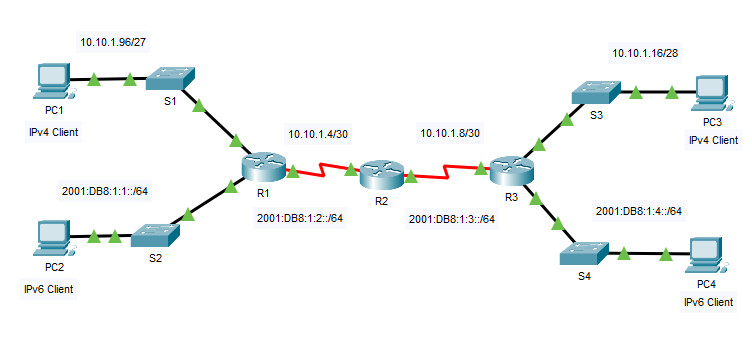
Addressing Table
| Device | Interface | IP Address / Prefix | Default Gateway | |
|---|---|---|---|---|
| R1 | G0/0 | 2001:db8:1:1::1/64 | N/A | |
| R1 | G0/1 | 10.10.1.97 | 255.255.255.224 | N/A |
| R1 | S0/0/1 | 10.10.1.6 | 255.255.255.252 | N/A |
| R1 | S0/0/1 | 2001:db8:1:2::2/64 | N/A | |
| R1 | S0/0/1 | fe80::1 | N/A | |
| R2 | S0/0/0 | 10.10.1.5 | 255.255.255.252 | N/A |
| R2 | S0/0/0 | 2001:db8:1:2::1/64 | N/A | |
| R2 | S0/0/1 | 10.10.1.9 | 255.255.255.252 | N/A |
| R2 | S0/0/1 | 2001:db8:1:3::1/64 | N/A | |
| R2 | S0/0/1 | fe80::2 | N/A | |
| R3 | G0/0 | 2001:db8:1:4::1/64 | N/A | |
| R3 | G0/1 | 10.10.1.17 | 255.255.255.240 | N/A |
| R3 | S0/0/1 | 10.10.1.10 | 255.255.255.252 | N/A |
| R3 | S0/0/1 | 2001:db8:1:3::2/64 | N/A | |
| R3 | S0/0/1 | fe80::3 | N/A | |
| PC1 | NIC | 10.10.1.98 | 255.255.255.224 | 10.10.1.97 |
| PC2 | NIC | 2001:db8:1:1::2/64 | fe80::1 | |
| PC3 | NIC | 10.10.1.18 | 255.255.255.240 | 10.10.1.17 |
| PC4 | NIC | 2001:db8:1:4::2/64 | fe80::1 | |
Objectives
Part 1: Test and Restore IPv4 Connectivity
Part 2: Test and Restore IPv6 Connectivity
Scenario
There are connectivity issues in this activity. In addition to gathering and documenting information about the network, you will locate the problems and implement acceptable solutions to restore connectivity.
Note: The user EXEC password is cisco. The privileged EXEC password is class.
Instructions
Part 1: Test and Restore IPv4 Connectivity
Step 1: Use ipconfig and ping to verify connectivity.
a. Click PC1 and open the Command Prompt.
b. Enter the ipconfig /all command to collect the IPv4 information. Complete the Addressing Table with the IPv4 address, subnet mask, and default gateway.
c. Click PC3 and open the Command Prompt.
d. Enter the ipconfig /all command to collect the IPv4 information. Complete the Addressing Table with the IPv4 address, subnet mask, and default gateway.
e. Use the ping command to test connectivity between PC1 and PC3. The ping should fail.
Step 2: Locate the source of connectivity failure.
a. From PC1, enter the necessary command to trace the route to PC3.
What is the last successful IPv4 address that was reached? 10.10.1.97
b. The trace will eventually end after 30 attempts. Enter Ctrl+C to stop the trace before 30 attempts.
c. From PC3, enter the necessary command to trace the route to PC1.
What is the last successful IPv4 address that was reached? 10.10.1.17
d. Enter Ctrl+C to stop the trace.
e. Click R1 and then the CLI tab. Press ENTER and log in to the router.
f. Enter the show ip interface brief command to list the interfaces and their status. There are two IPv4 addresses on the router. One should have been recorded in Step 2a.
What is the other? 10.10.1.6
g. Enter the show ip route command to list the networks to which the router is connected. Note that there are two networks connected to the Serial0/0/1 interface.
What are they? 10.10.1.6/32, 10.10.1.4/30
R1#show ip route
Codes: L - local, C - connected, S - static, R - RIP, M - mobile, B - BGP
D - EIGRP, EX - EIGRP external, O - OSPF, IA - OSPF inter area
N1 - OSPF NSSA external type 1, N2 - OSPF NSSA external type 2
E1 - OSPF external type 1, E2 - OSPF external type 2, E - EGP
i - IS-IS, L1 - IS-IS level-1, L2 - IS-IS level-2, ia - IS-IS inter area
* - candidate default, U - per-user static route, o - ODR
P - periodic downloaded static route

Gateway of last resort is not set

10.0.0.0/8 is variably subnetted, 4 subnets, 3 masks
C 10.10.1.4/30 is directly connected, Serial0/0/1
L 10.10.1.6/32 is directly connected, Serial0/0/1
C 10.10.1.96/27 is directly connected, GigabitEthernet0/1
L 10.10.1.97/32 is directly connected, GigabitEthernet0/1
h. Repeat steps 2e through 2g with R3 and record your answers.
10.10.1.10, 10.10.1.8/30, 10.10.1.10/32
i. Click R2. Press ENTER and log into the router.
j. Enter the show ip interface brief command and record your addresses.
10.10.1.2, 10.10.1.9
k. Run more tests if it helps visualize the problem. Simulation mode is available.
Step 3: Propose a solution to solve the problem.
a. Compare your answers in Step 2 to the documentation you have available for the network. What is the error?
R2’s Serial 0/0/0 interface is configured with the wrong IP address
b. What solution would you propose to correct the problem?
Configure the correct IP address on R2’s Serial 0/0/0 interface (10.10.1.5)
Step 4: Implement the plan.
Implement the solution you proposed in Step 3b.
R2>en
R2#show ip interface brief
Interface IP-Address OK? Method Status Protocol
GigabitEthernet0/0 unassigned YES unset administratively down down
GigabitEthernet0/1 unassigned YES unset administratively down down
Serial0/0/0 10.10.1.2 YES manual up up
Serial0/0/1 10.10.1.9 YES manual up up
Vlan1 unassigned YES unset administratively down down
Fix:
R2#configure terminal
R2(config)#interface serial 0/0/0
R2(config-if)#ip address 10.10.1.5 255.255.255.252
R2(config-if)#exit
R2(config)#exit
Serial0/0/1 10.10.1.9 YES manual up up
Vlan1 unassigned YES unset administratively down down
Step 5: Verify that connectivity is restored.
a. From PC1 test connectivity to PC3.
b. From PC3 test connectivity to PC1.
Is the problem resolved? Yes
Step 6: Document the solution.
Part 2: Test and Restore IPv6 Connectivity
Step 1: Use ipv6config and ping to verify connectivity.
a. Click PC2 and click the Desktop tab > Command Prompt.
b. Enter the ipv6config /all command to collect the IPv6 information. Complete the Addressing Table with the IPv6 address, subnet prefix, and default gateway.
c. Click PC4 and click the Desktop tab > Command Prompt.
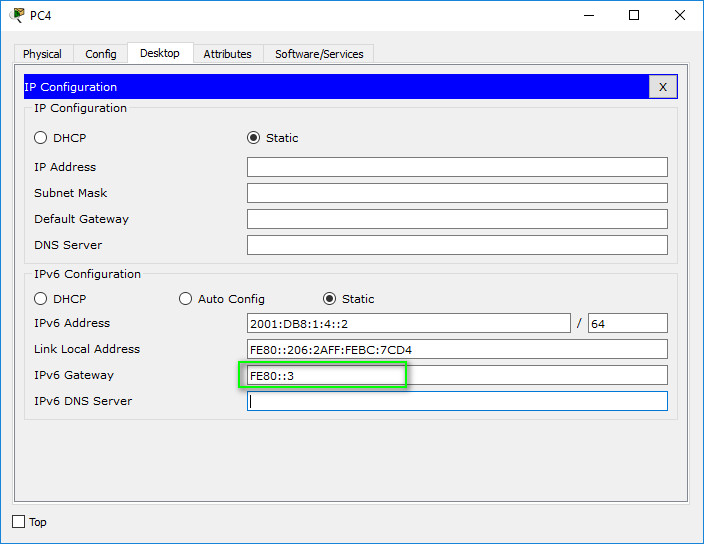
d. Enter the ipv6config /all command to collect the IPv6 information. Complete the Addressing Table with the IPv6 address, subnet prefix, and default gateway.
e. Test connectivity between PC2 and PC4. The ping should fail.
Step 2: Locate the source of connectivity failure.
a. From PC2, enter the necessary command to trace the route to PC4.
What is the last successful IPv6 address that was reached?
2001:db8:1:3::2
b. The trace will eventually end after 30 attempts. Enter Ctrl+C to stop the trace before 30 attempts.
c. From PC4, enter the necessary command to trace the route to PC2.
What is the last successful IPv6 address that was reached?
No IPv6 address was reached.
d. Enter Ctrl+C to stop the trace.
e. Click R3. Press ENTER and log in to the router.
f. Enter the show ipv6 interface brief command to list the interfaces and their status. There are two IPv6 addresses on the router. One should match the gateway address recorded in Step 1d.
Is there a discrepancy?
Yes
g. Run more tests if it helps visualize the problem. Simulation mode is available.
Step 3: Propose a solution to solve the problem.
a. Compare your answers in Step 2 to the documentation you have available for the network. What is the error?
PC4 is using the wrong default gateway configuration
b. What solution would you propose to correct the problem?
Configure PC4 with the correct default gateway address: FE80::3.
Step 4: Implement the plan.
Implement the solution you proposed in Step 3b.

Step 5: Verify that connectivity is restored.
a. From PC2 test connectivity to PC4.
b. From PC4 test connectivity to PC2.
Is the problem resolved? Yes
Step 6: Document the solution.
Download PDF & PKA file:
[sociallocker id=”54558″][wpdm_package id=’55692′]
[wpdm_package id=’55689′]
[/sociallocker]
[alert-note][one_half]
Previous Lab
13.2.6 Packet Tracer – Verify IPv4 and IPv6 Addressing
[/one_half][one_half_last]
Next Lab
13.3.1 Packet Tracer – Use ICMP to Test and Correct Network Connectivity
[/one_half_last][/alert-note]
