4.3.8 Packet Tracer – Configure Layer 3 Switching and Inter-VLAN Routing (Instructor Version)
Addressing Table
| Device | Interface | IP Address / Prefix |
|---|---|---|
| MLS | VLAN 10 | 192.168.10.254 /24 |
| 2001:db8:acad:10::1/64 | ||
| VLAN 20 | 192.168.20.254 /24 | |
| 2001:db8:acad:20::1/64 | ||
| VLAN 30 | 192.168.30.254/24 | |
| 2001:db8:acad:30::1/64 | ||
| VLAN 99 | 192.168.99.254/24 | |
| G0/2 | 209.165.200.225 | |
| 2001:db8:acad:a::1/64 | ||
| PC0 | NIC | 192.168.10.1 |
| PC1 | NIC | 192.168.20.1 |
| PC2 | NIC | 192.168.30.1 |
| PC3 | NIC | 192.168.10.2/24 |
| 2001:db8:acad:10::2/64 | ||
| PC4 | NIC | 192.168.20.2/24 |
| 2001:db8:acad:20::2/64 | ||
| PC5 | NIC | 192.168.30.2 |
| 2001:db8:acad:10::2/64 | ||
| S1 | VLAN 99 | 192.168.99.1 |
| S2 | VLAN 99 | 192.168.99.2 |
| S3 | VLAN 99 | 192.168.99.3 |
Objectives
- Part 1: Configure Layer 3 Switching
- Part 2: Configure Inter-VLAN Routing
- Part 3: Configure IPv6 Inter-VLAN Routing
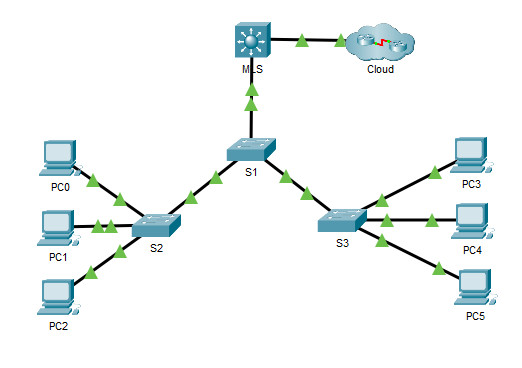
Background / Scenario
A multilayer switch like the Cisco Catalyst 3650 is capable of both Layer 2 switching and Layer 3 routing. One of the advantages of using a multilayer switch is this dual functionality. A benefit for a small to medium-sized company would be the ability to purchase a single multilayer switch instead of separate switching and routing network devices. Capabilities of a multilayer switch include the ability to route from one VLAN to another using multiple switched virtual interfaces (SVIs), as well as the ability to convert a Layer 2 switchport to a Layer 3 interface.
Instructions
Part 1: Configure Layer 3 Switching
In Part 1, you will configure the GigabitEthernet 0/2 port on switch MLS as a routed port and verify that you can ping another Layer 3 address.
a. On MLS, configure G0/2 as a routed port and assign an IP address according to the Addressing Table.
MLS(config)# interface g0/2
MLS(config-if)# no switchport
MLS(config-if)# ip address 209.165.200.225 255.255.255.252
b. Verify connectivity to Cloud by pinging 209.165.200.226.
MLS# ping 209.165.200.226

Type escape sequence to abort.
Sending 5, 100-byte ICMP Echos to 209.165.200.226, timeout is 2 seconds:
!!!!!
Success rate is 100 percent (5/5), round-trip min/avg/max = 0/0/0 ms
Part 2: Configure Inter-VLAN Routing
Step 1: Add VLANs.
Add VLANs to MLS according to the table below. Packet Tracer scoring is case-sensitive, so type the names exactly as shown.
| VLAN Number | VLAN Name |
|---|---|
| 10 | Staff |
| 20 | Student |
| 30 | Faculty |
MLS(config)#vlan 10
MLS(config-vlan)#name Staff
MLS(config-vlan)#vlan 20
MLS(config-vlan)#name Student
MLS(config-vlan)#vlan 30
MLS(config-vlan)#name Faculty
Step 2: Configure SVI on MLS.
Configure and activate the SVI interfaces for VLANs 10, 20, 30, and 99 according to the Addressing Table. The configuration for VLAN 10 is shown below as an example.
MLS(config)# interface vlan 10
MLS(config-if)# ip address 192.168.10.254 255.255.255.0
MLS(config-if)#interface vlan 20
MLS(config-if)#ip address 192.168.20.254 255.255.255.0
MLS(config-if)#ipv6 address 2001:db8:acad:20::1/64
MLS(config-if)#interface vlan 30
MLS(config-if)#ip address 192.168.30.254 255.255.255.0
MLS(config-if)#ipv6 address 2001:db8:acad:30::1/64

MLS(config-if)#interface vlan 99
MLS(config-if)#ip address 192.168.99.254 255.255.255.0
MLS(config-if)#
Step 3: Configure Trunking on MLS.
Trunk configuration differs slightly on a Layer 3 switch. On the Layer 3 switch, the trunking interface needs to be encapsulated with the dot1q protocol, however it is not necessary to specify VLAN numbers as it is when working with a router and subinterfaces.
a. On MLS, configure interface g0/1.
b. Make the interface a static trunk port.
MLS(config-if)# switchport mode trunk
c. Specify the native VLAN as 99.
MLS(config-if)# switchport trunk native vlan 99
d. Encapsulate the link with the dot1q protocol.
MLS(config-if)# switchport trunk encapsulation dot1q
Note: Packet Tracer may not score the trunk encapsulation.
Step 4: Configure trunking on S1.
a. Configure interface g0/1 of S1 as a static trunk.
b. Configure the native VLAN on the trunk.
S1(config)#interface g0/1
S1(config-if)#switchport mode trunk
S1(config-if)#switchport trunk native vlan 99
Step 5: Enable routing.
a. Use the show ip route command. Are there any active routes? No
b. Enter the ip routing command to enable routing in global configuration mode.
MLS(config)# ip routing
c. Use the show ip route command to verify routing is enabled.
MLS# show ip route
Codes: C - connected, S - static, I - IGRP, R - RIP, M - mobile, B - BGP
       D - EIGRP, EX - EIGRP external, O - OSPF, IA - OSPF inter area
       N1 - OSPF NSSA external type 1, N2 - OSPF NSSA external type 2
       E1 - OSPF external type 1, E2 - OSPF external type 2, E - EGP
       i - IS-IS, L1 - IS-IS level-1, L2 - IS-IS level-2, ia - IS-IS inter area
       * - candidate default, U - per-user static route, o - ODR
       P - periodic downloaded static route

Gateway of last resort is not set

C    192.168.10.0/24 is directly connected, Vlan10
C    192.168.20.0/24 is directly connected, Vlan20
C    192.168.30.0/24 is directly connected, Vlan30
C    192.168.99.0/24 is directly connected, Vlan99
     209.165.200.0/30 is subnetted, 1 subnets
C    209.165.200.224 is directly connected, GigabitEthernet0/2
Step 6: Verify end-to-end connectivity.
a. From PC0, ping PC3 or MLS to verify connectivity within VLAN 10.
b. From PC1, ping PC4 or MLS to verify connectivity within VLAN 20.
c. From PC2, ping PC5 or MLS to verify connectivity within VLAN 30.
d. From S1, ping S2, S3, or MLS to verify connectivity with VLAN 99.
e. To verify inter-VLAN routing, ping devices outside the sender’s VLAN.
f. From any device, ping this address inside Cloud, 209.165.200.226.
The Layer 3 switch is now routing between VLANs and providing routed connectivity to the cloud.
Part 3: Configure IPv6 Inter-VLAN Routing
Layer 3 switches also route between IPv6 networks.
Step 1: Enable IPv6 routing.
Enter the ipv6 unicast-routing command to enable IPv6 routing in global configuration mode.
MLS(config)# ipv6 unicast-routing
Step 2: Configure SVI for IPv6 on MLS.
Configure IPv6 addressing on SVI for VLANs 10, 20, and 30 according to the Addressing Table. The configuration for VLAN 10 is shown below.
MLS(config)# interface vlan 10
MLS(config-if)# ipv6 address 2001:db8:acad:10::1/64
Step 3: Configure G0/2 with IPv6 on MLS.
a. Configure IPv6 addressing on G0/2.
MLS(config)# interface G0/2
MLS(config-if)# ipv6 address 2001:db8:acad:a::1/64
b. Use the show ipv6 route command to verify IPv6 connected networks.
MLS# show ipv6 route
IPv6 Routing Table - 10 entries
Codes: C - Connected, L - Local, S - Static, R - RIP, B - BGP
       U - Per-user Static route, M - MIPv6
       I1 - ISIS L1, I2 - ISIS L2, IA - ISIS interarea, IS - ISIS summary
       O - OSPF intra, OI - OSPF inter, OE1 - OSPF ext 1, OE2 - OSPF ext 2
       ON1 - OSPF NSSA ext 1, ON2 - OSPF NSSA ext 2
       D - EIGRP, EX - EIGRP external
S   ::/0 [1/0]
     via 2001:DB8:ACAD:A::2, GigabitEthernet0/2
C   2001:DB8:ACAD:A::/64 [0/0]
     via ::, GigabitEthernet0/2
L   2001:DB8:ACAD:A::1/128 [0/0]
     via ::, GigabitEthernet0/2
C   2001:DB8:ACAD:10::/64 [0/0]
     via ::, Vlan10
L   2001:DB8:ACAD:10::1/128 [0/0]
     via ::, Vlan10
C   2001:DB8:ACAD:20::/64 [0/0]
     via ::, Vlan20
L   2001:DB8:ACAD:20::1/128 [0/0]
     via ::, Vlan20
C   2001:DB8:ACAD:30::/64 [0/0]
     via ::, Vlan30
L   2001:DB8:ACAD:30::1/128 [0/0]
     via ::, Vlan30
L   FF00::/8 [0/0]
     via ::, Null0
Step 4: Verify IPv6 connectivity.
Devices PC3, PC4, and PC5 have been configured with IPv6 addresses. Verify IPv6 inter-VLAN routing and connectivity to Cloud.
a. From PC3, ping MLS to verify connectivity within VLAN 10.
b. From PC4, ping MLS to verify connectivity within VLAN 20.
c. From PC5, ping MLS to verify connectivity within VLAN 30.
d. To verify inter-VLAN routing, ping between devices PC3, PC4, and PC5.
e. From PC3 ping the address inside Cloud, 2001:db8:acad:a::2.
Script Answers – Download PDF & PKA file:
[sociallocker id=”54558″]
[tabs]
[tab title=”MLS”]
enable
config t
ip routing
ipv6 unicast-routing
interface GigabitEthernet0/1
 switchport trunk native vlan 999
 switchport trunk encapsulation dot1q
 switchport mode trunk
interface GigabitEthernet0/2
 no switchport
 ip address 209.165.200.225 255.255.255.252
 ipv6 address 2001:DB8:ACAD:A::1/64vlan 10
 name Staff
vlan 20
 name Student
vlan 30
 name Faculty
interface Vlan10
 ip address 192.168.10.254 255.255.255.0
 ipv6 address 2001:DB8:ACAD:10::1/64
 no shutdown
interface Vlan20
 ip address 192.168.20.254 255.255.255.0
 ipv6 address 2001:DB8:ACAD:20::1/64
 no shutdown
interface Vlan30
 ip address 192.168.30.254 255.255.255.0
 ipv6 address 2001:DB8:ACAD:30::1/64
 no shutdown
interface Vlan99
 ip address 192.168.99.254 255.255.255.0
 no shutdown
end
[/tab]
[tab title=”S1″]
enable
conf t
int g0/1
switchport mode trunk
switchport trunk native vlan 99
end
[/tab]
[/tabs]
[wpdm_package id=’39021′]
[wpdm_package id=’39023′]
[/sociallocker]
[alert-note][one_half]
Previous Lab
4.2.7 Packet Tracer – Configure Router-on-a-Stick Inter-VLAN Routing
[/one_half][one_half_last]
Next Lab
4.4.8 Packet Tracer – Troubleshoot Inter-VLAN Routing
[/one_half_last][/alert-note]