13.5.1 Packet Tracer – WLAN Configuration (Instructor Version)
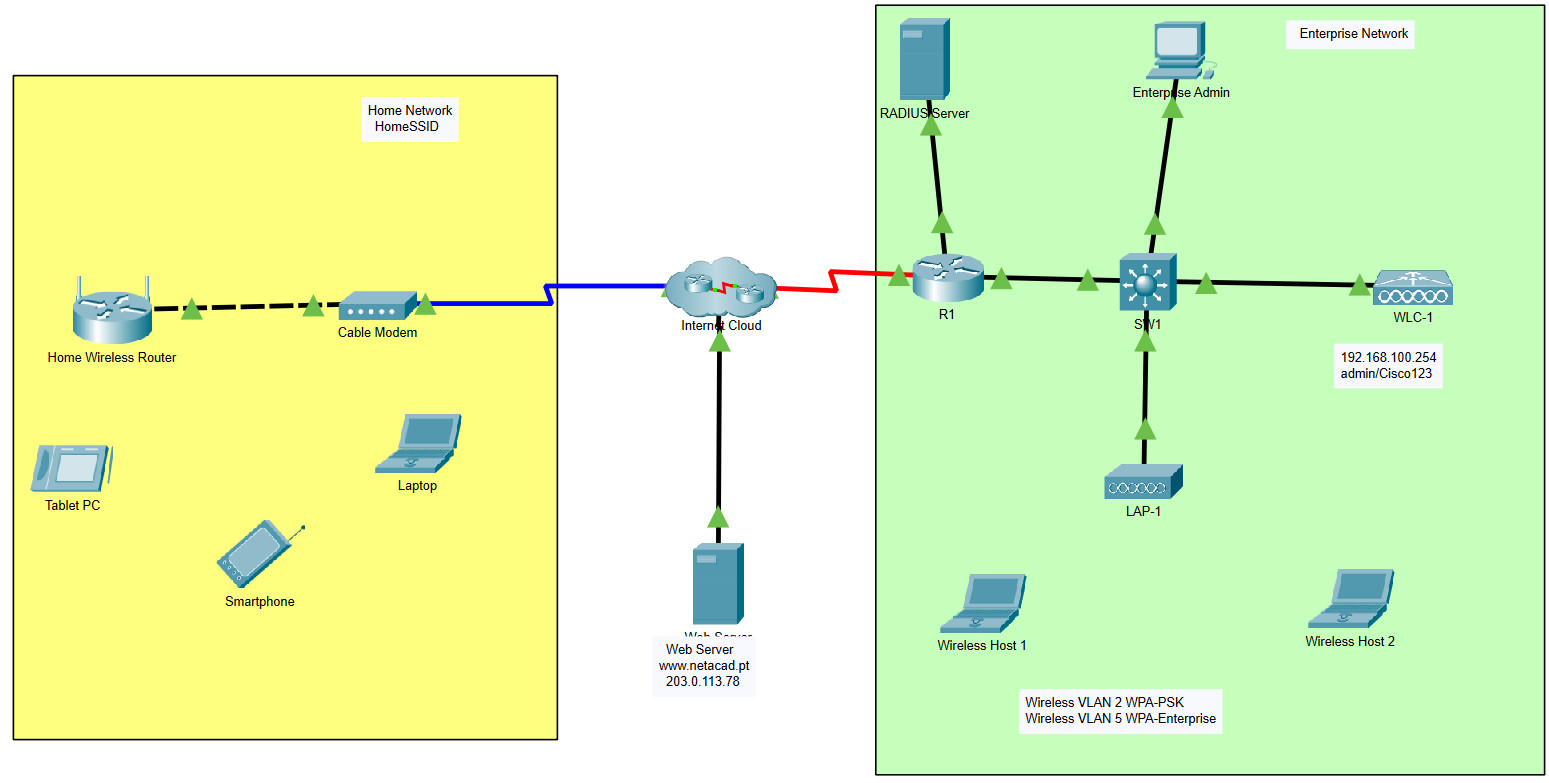
Addressing Table
| Device | Interface | IP Address |
|---|---|---|
| Home Wireless Router | Internet | DHCP |
| LAN | 192.168.6.1/27 | |
| RTR-1 | G0/0/0.2 | 192.168.2.1/24 |
| G0/0/0.5 | 192.168.5.1/24 | |
| G0/0/0.100 | 192.168.100.1/24 | |
| G0/0/1 | 10.6.0.1/24 | |
| SW1 | VLAN 200 | 192.168.100.100/24 |
| LAP-1 | G0 | DHCP |
| WLC-1 | Management | 192.168.100.254/24 |
| RADIUS Server | NIC | 10.6.0.254/24 |
| Home Admin | NIC | DHCP |
| Enterprise Admin | NIC | 192.168.100.200/24 |
| Web Server | NIC | 203.0.113.78/24 |
| DNS Server | NIC | 10.100.100.252 |
| Laptop | NIC | DHCP |
| Tablet PC | Wireless0 | DHCP |
| Smartphone | Wireless0 | DHCP |
| Wireless Host 1 | Wireless0 | DHCP |
| Wireless Host 2 | Wireless0 | DHCP |
WLAN Information
| WLAN | SSID | Authentication | Username | Password |
|---|---|---|---|---|
| Home Network | HomeSSID | WPA2-Personal | N/A | Cisco123 |
| WLAN VLAN 2 | SSID-2 | WPA-2 Personal | N/A | Cisco123 |
| WLAN VLAN 5 | SSID-5 | WPA-2 Enterprise | userWLAN5 | userW5pass |
Objectives
In this activity, you will configure both a wireless home router and a WLC-based network. You will implement both WPA2-PSK and WPA2-Enterprise security.
- Configure a home router to provide Wi-Fi connectivity to a variety of devices.
- Configure WPA2-PSK security on a home router.
- Configure interfaces on a WLC.
- Configure WLANs on a WLC.
- Configure WPA2-PSK security on a WLAN and connect hosts to WLAN.
- Configure WPA2-Enteprise on a WLAN and connect hosts to the WLAN.
- Verify connectivity WLAN connectivity.
Background / Scenario
You will apply your WLAN skills and knowledge by configuring a home wireless router and an enterprise WLC. You will implement both WPA2-PSK and WPA2-Enterprise security. Finally, you will connect hosts to each WLAN and verify connectivity.
Instructions
Part 1: Configure a Home Wireless Router.
You are installing a new home wireless router at a friend’s house. You will need to change settings on the router to enhance security and meet your friend’s requirements.
Step 1: Change DHCP settings.
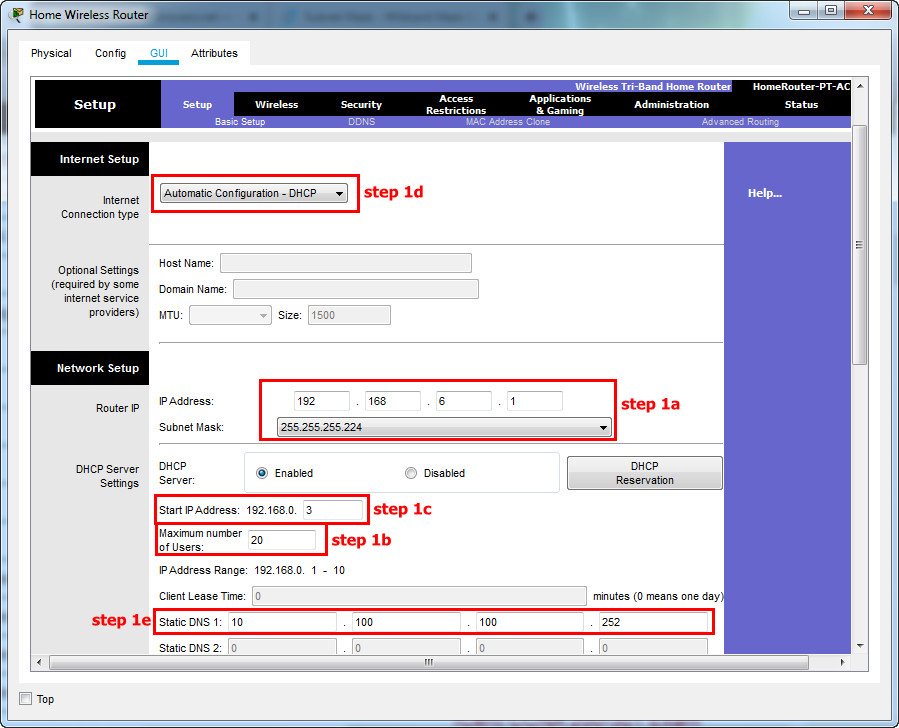
a. Open the Home Wireless Router GUI and change the router IP and DHCP settings according to the information in the Addressing Table.
b. Permit a maximum of 20 addresses to be issued by the router.
c. Configure the DHCP server to start with IP address .3 of the LAN network.
d. Configure the internet interface of the router to receive its IP address over DHCP.
Verify the address. What address did it receive?
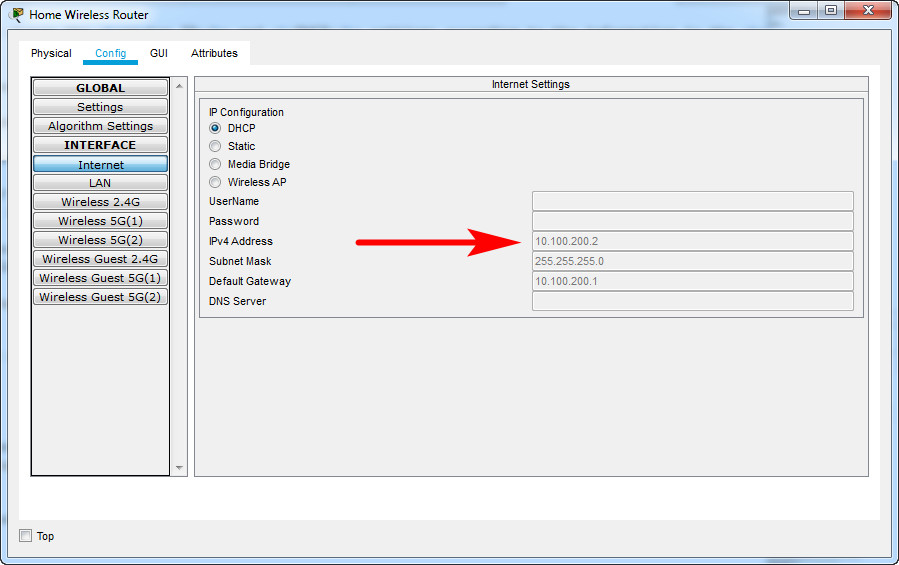
e. Configure the static DNS server to the address in the Addressing Table.
Go to Home Wireless Router, GUI tab. Change configuration as shown below and Save Setting
Step 2: Configure the Wireless LAN.
a. The network will use the 2.4GHz Wireless LAN interface. Configure the interface with the SSID shown in the Wireless LAN information table.
b. Use channel 6.
Go to tab Wireless. Change configuration as shown below and Save Setting
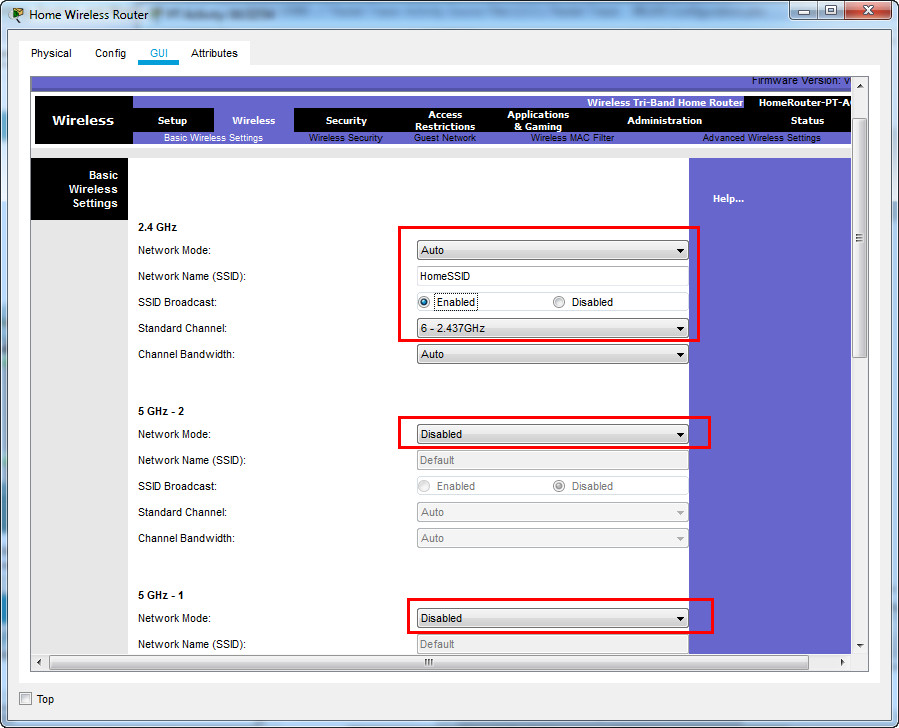
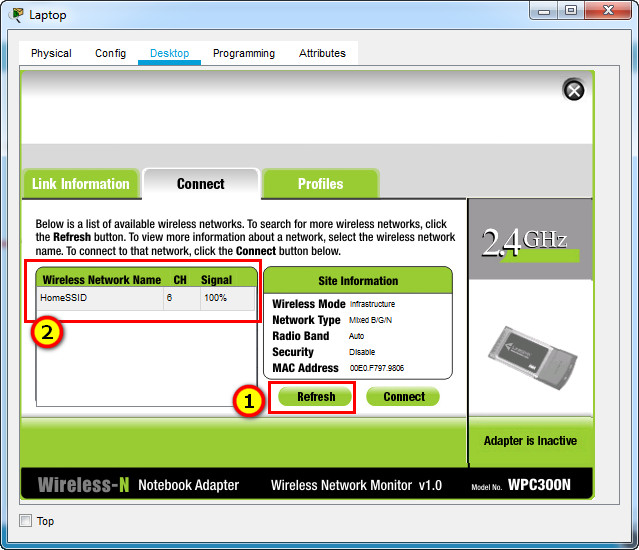
c. Be sure that all wireless hosts in the home will be able to see the SSID.
To see it, go to Laptop –> PC Wireless –> Connect tab
Step 3: Configure security.
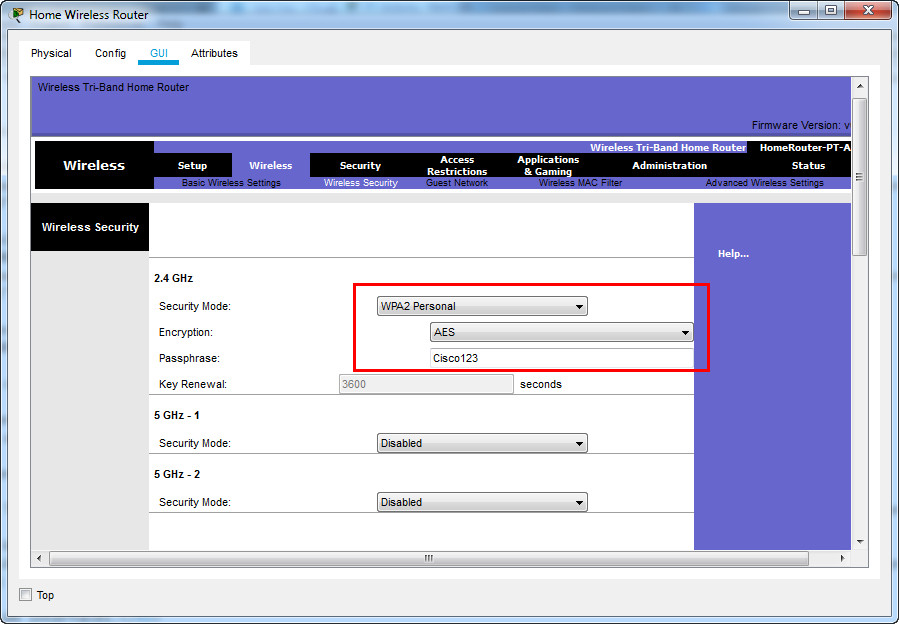
a. Configure wireless LAN security. Use WPA2 Personal and the passphrase shown in the Wireless LAN information table.
Go to Wireless tab, Wireless Security
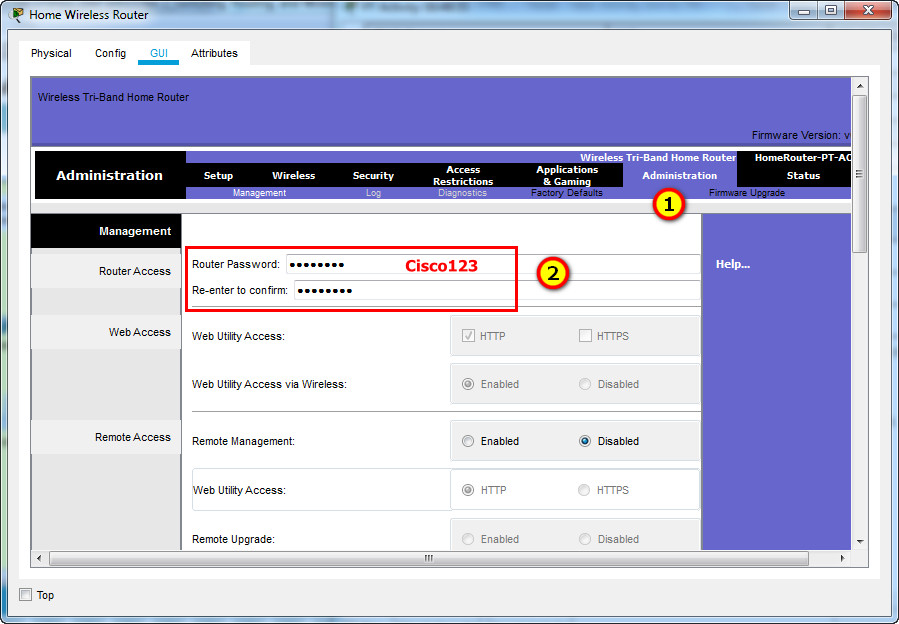
b. Secure the router by changing the default password to the value shown in the Wireless LAN information table.
Go to Administration tab, change Router Password to Cisco123 and Save Setting
Step 4: Connect clients to the network.
a. Open the PC Wireless app on the desktop of the laptop and configure the client to connect to the network.
[tabs]
[tab title=”Step 1″] 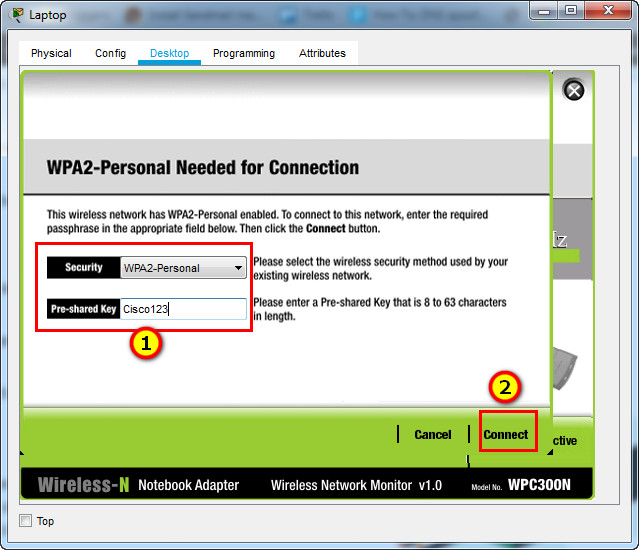 [/tab]
[tab title=”Step 2″] 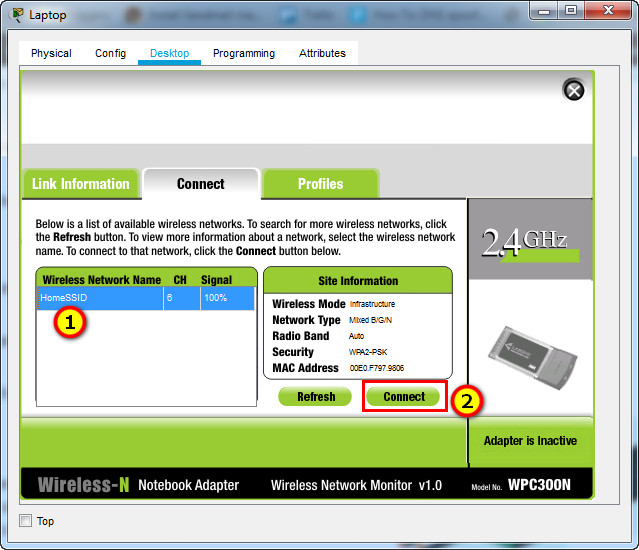 [/tab]
[tab title=”Done”] 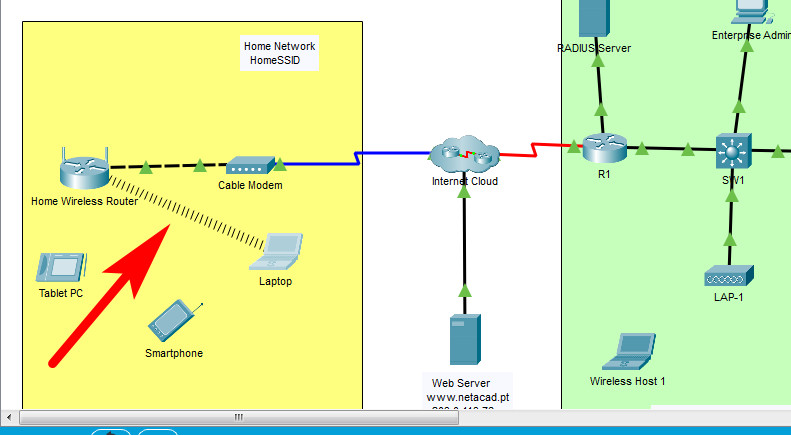 [/tab]
[/tabs]
b. Open the Config tab on the Tablet PC and Smartphone and configure the wireless interfaces to connect to the wireless network.
[tabs]
[tab title=”Tablet PC”] 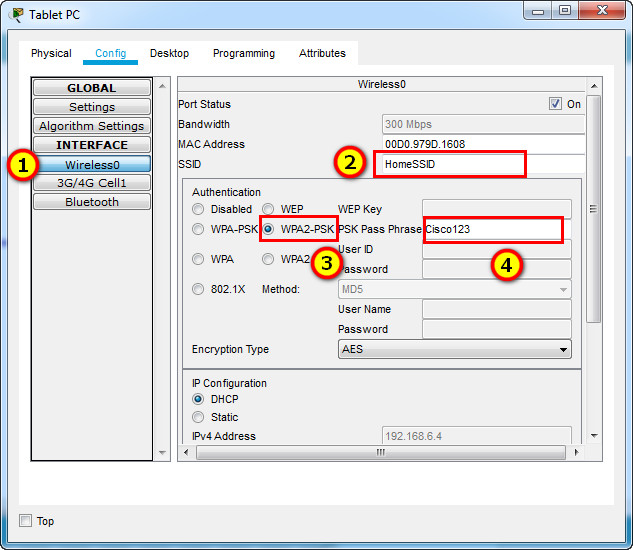
[tab title=”Smartphone”] 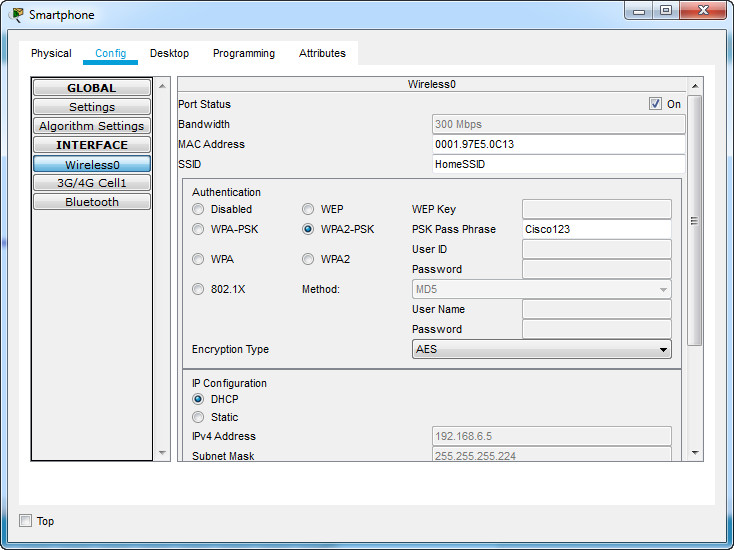 [/tab]
[/tabs]
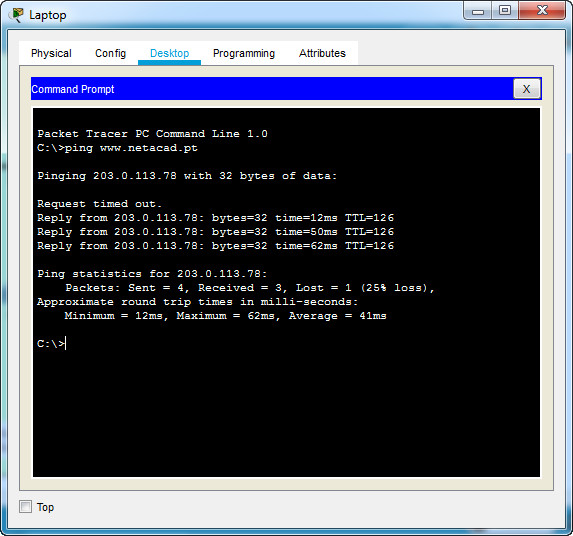
c. Verify connectivity. The hosts should be able to ping each other and the web server. They should also be able to reach the web server URL.
From Laptop, Tablet PC, Smartphone, ping to Web Server
Part 2: Configure a WLC Controller Network
Configure the wireless LAN controller with two WLANs. One WLAN will use WPA2-PSK authentication. The other WLAN will use WPA2-Enterprise authentication. You will also configure the WLC to use an SNMP server and configure a DHCP scope that will be used by the wireless management network.
Step 1: Configure VLAN interfaces.
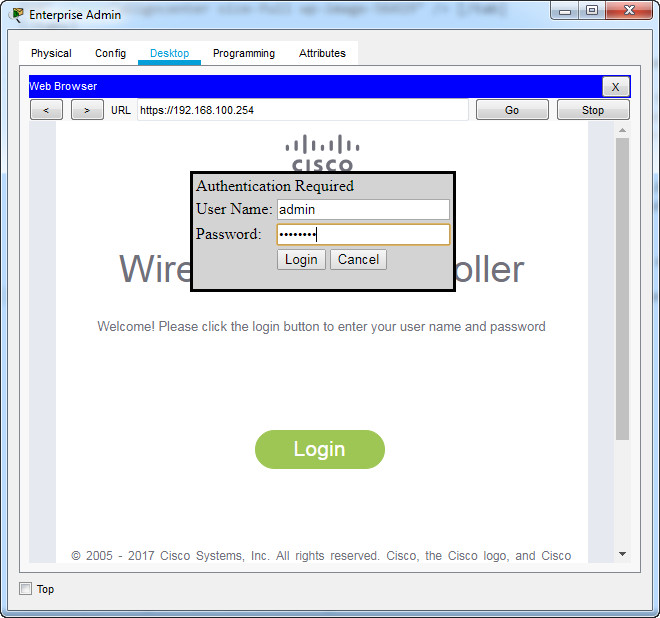
a. From the Enterprise Admin, navigate to the WLC-1 management interface via a web browser. To log into WLC-1, use admin as the username and Cisco123 as the password.
Go to Enterprise Admin PC, Web browser app, Enter: https://192.168.100.254
b. Configure an interface for the first WLAN.
Name: WLAN 2
VLAN Identifier: 2
Port Number: 1
Interface IP Address: 192.168.2.254
Netmask: 255.255.255.0
Gateway: RTR-1 G0/0/0.2 address
Primary DHCP Server: Gateway address
[tabs]
[tab title=”Screen 1″] 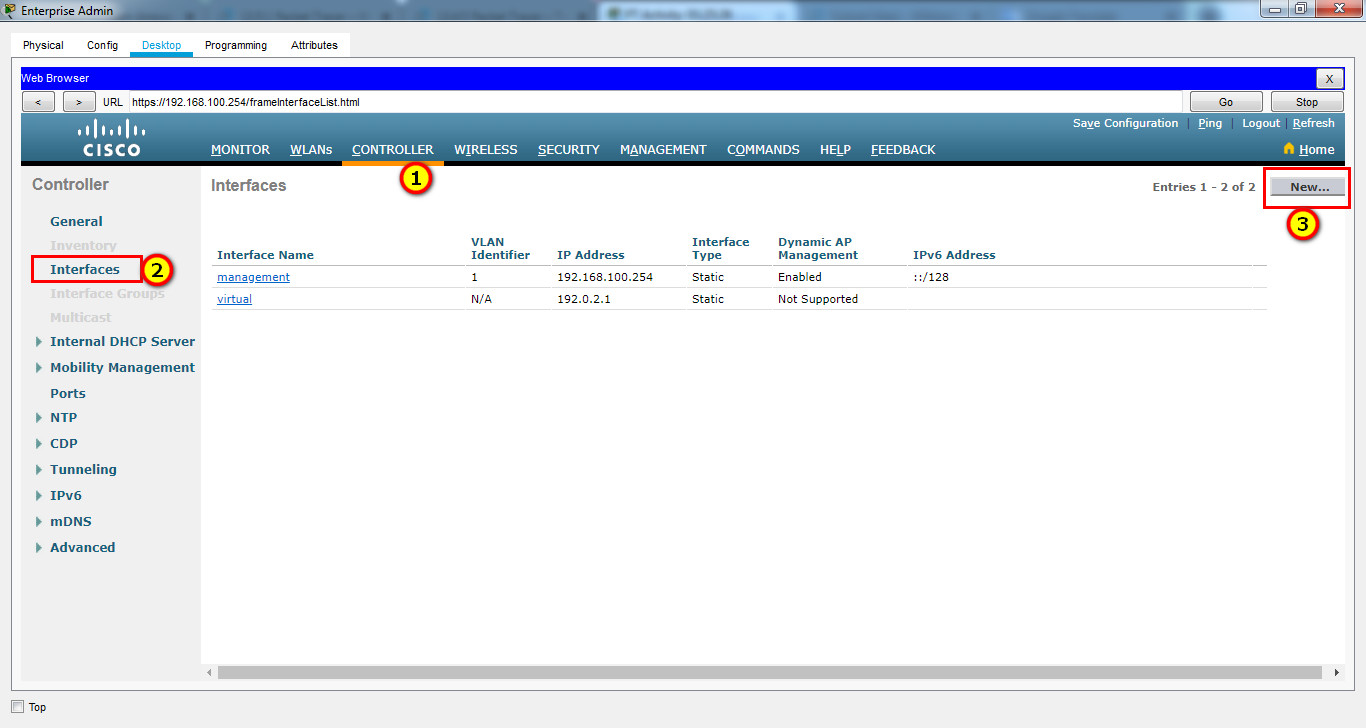 [/tab]
[tab title=”Screen 2″] 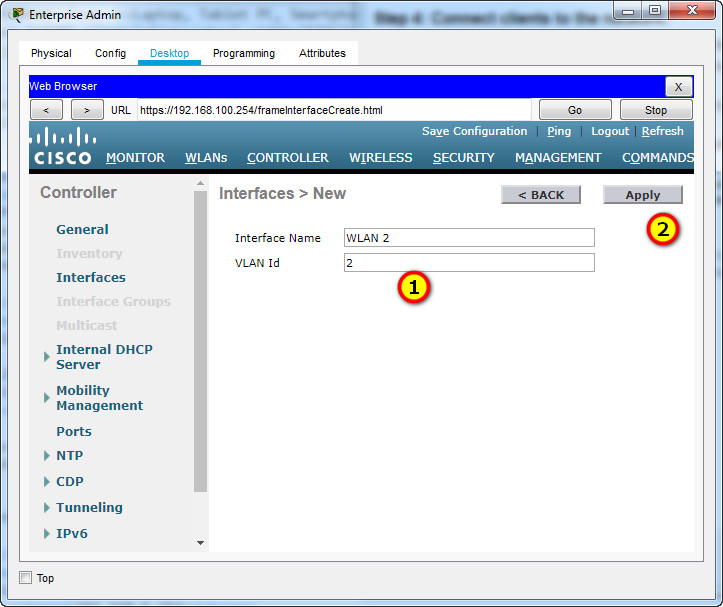 [/tab]
[tab title=”Screen 3″] 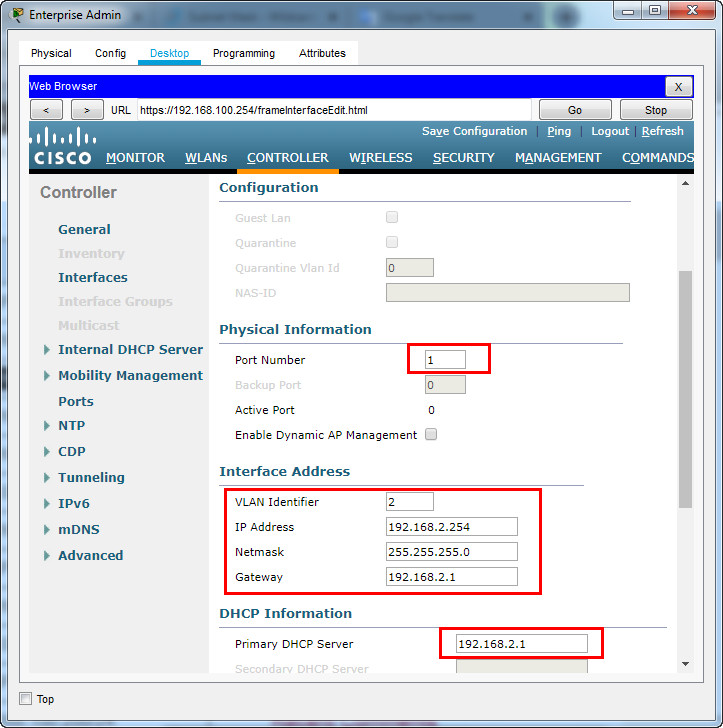 [/tab]
[/tabs]
c. Configure an interface for the second WLAN.
Name: WLAN 5
VLAN Identifier: 5
Port Number: 1
Interface IP Address: 192.168.5.254
Netmask: 255.255.255.0
Gateway: RTR-1 interface G0/0/0.5 address
Primary DHCP Server: Gateway address
[tabs]
[tab title=”Screen 1″] 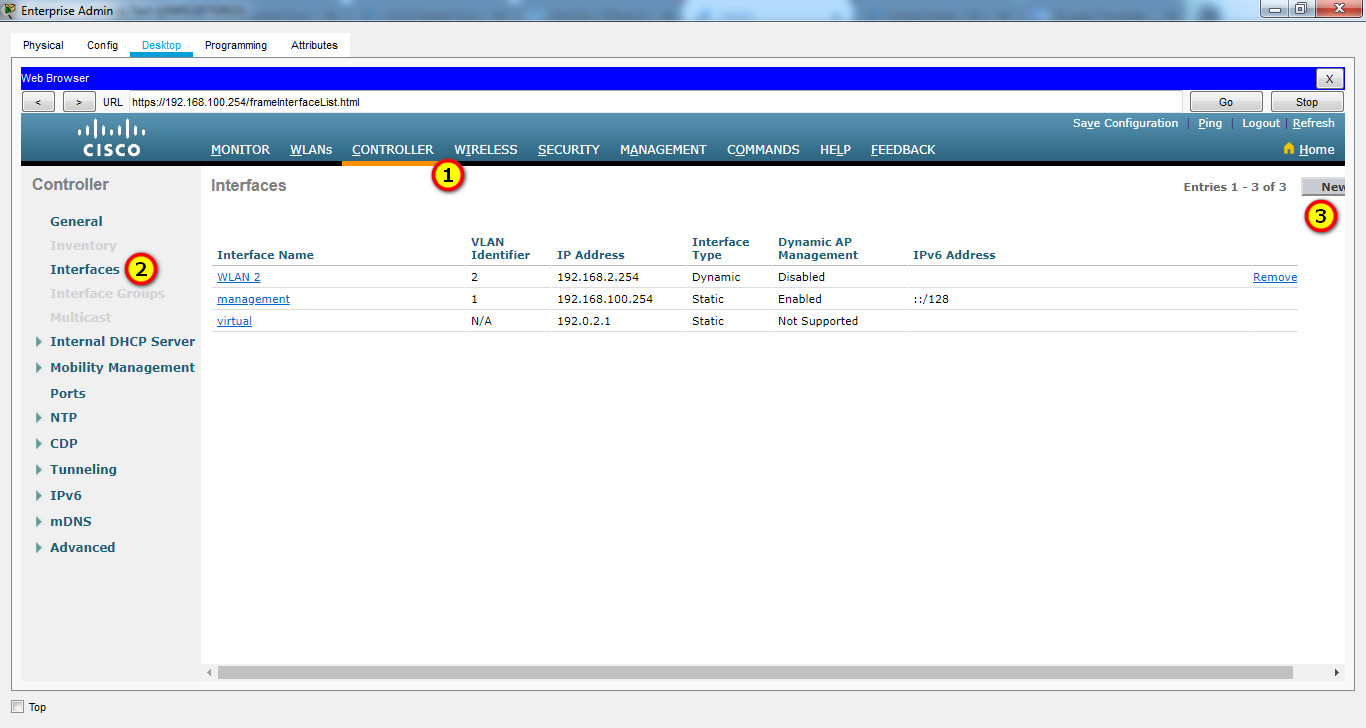 [/tab]
[tab title=”Screen 2″] 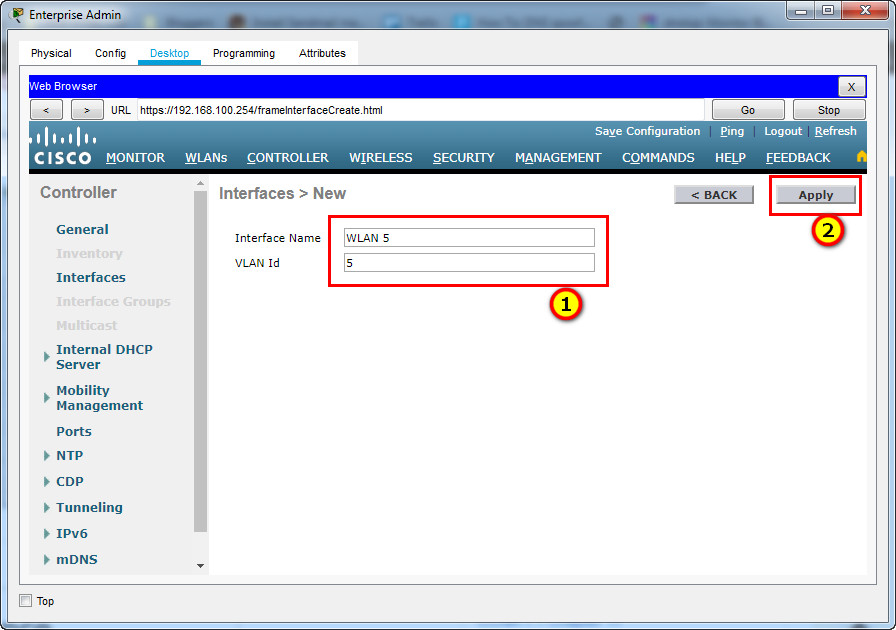 [/tab]
[tab title=”Screen 3″] 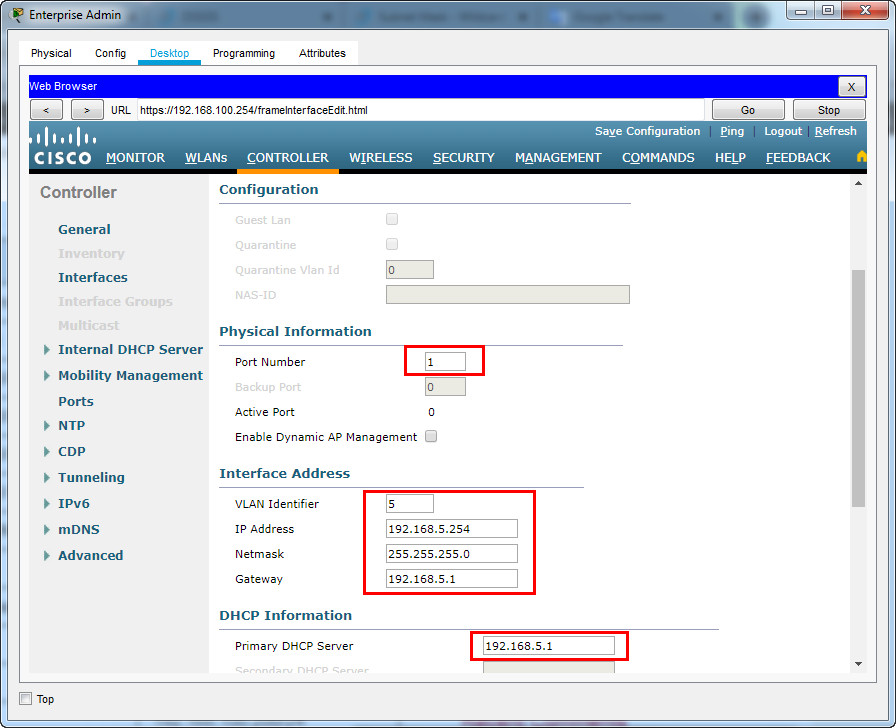 [/tab]
[/tabs]
Step 2: Configure a DHCP scope for the wireless management network.
Configure and enable an internal DHCP scope as follows:
Scope Name: management
Pool Start Address: 192.168.100.235
Pool End Address: 192.168.100.245
Network: 192.168.100.0
Netmask: 255.255.255.0
Default Routers: 192.168.100.1
[tabs]
[tab title=”Screen 1″] 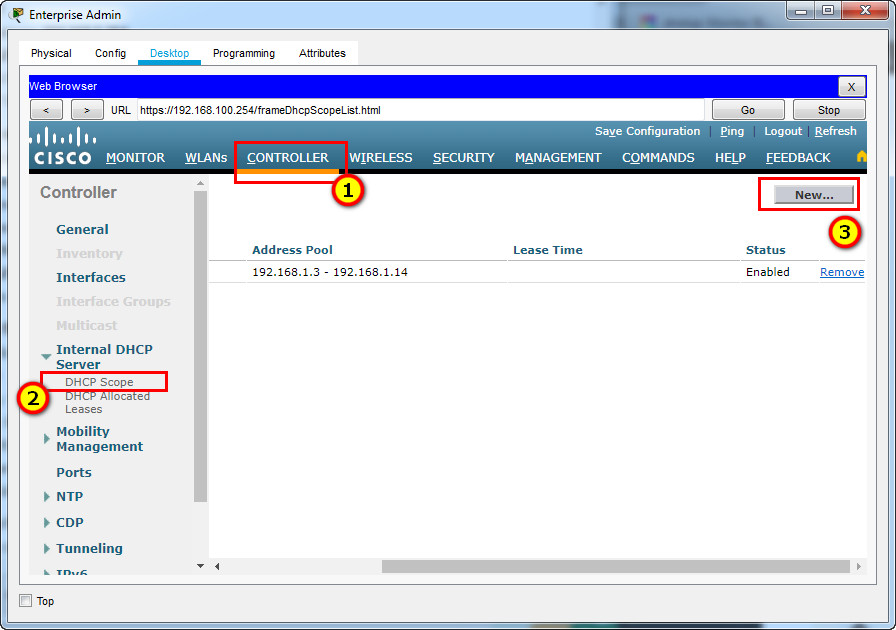 [/tab]
[tab title=”Screen 2″] 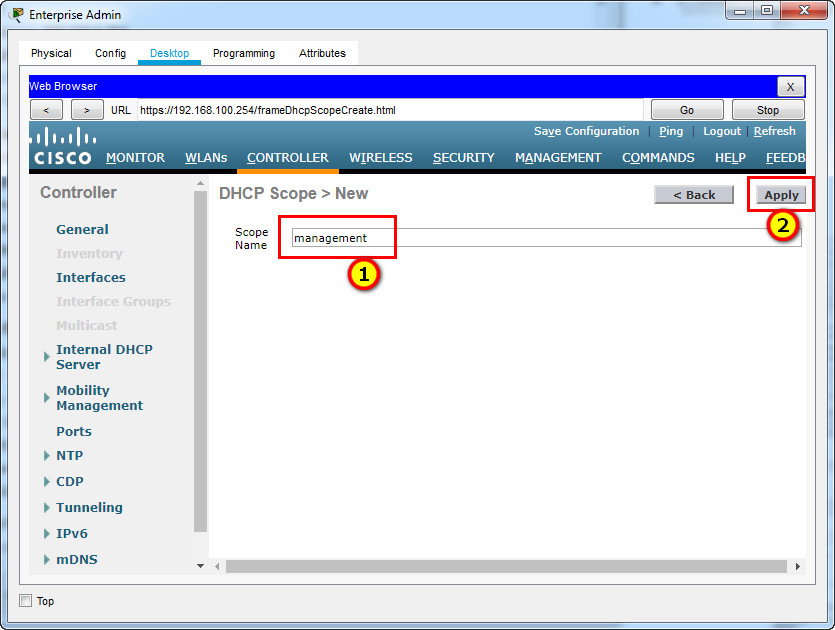 [/tab]
[tab title=”Screen 3″] 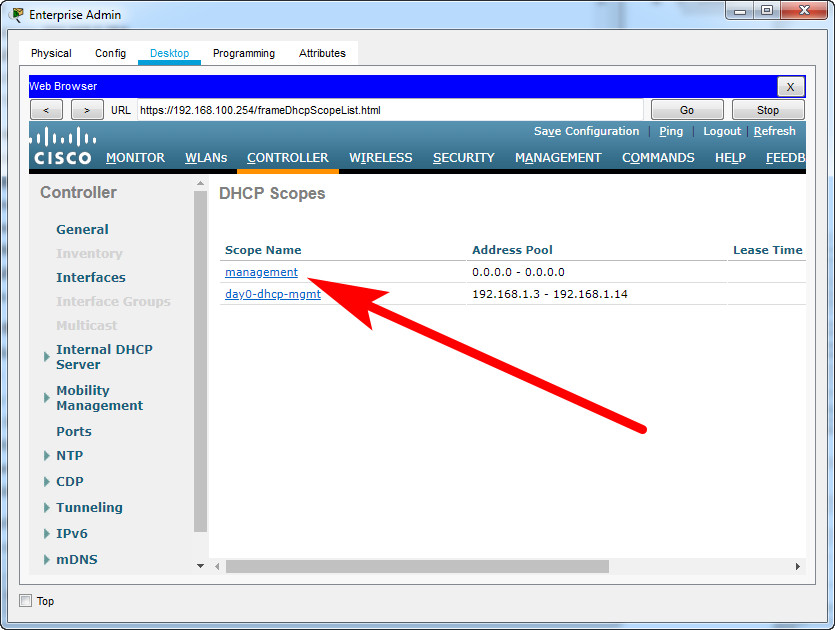 [/tab]
[tab title=”Screen 4″] 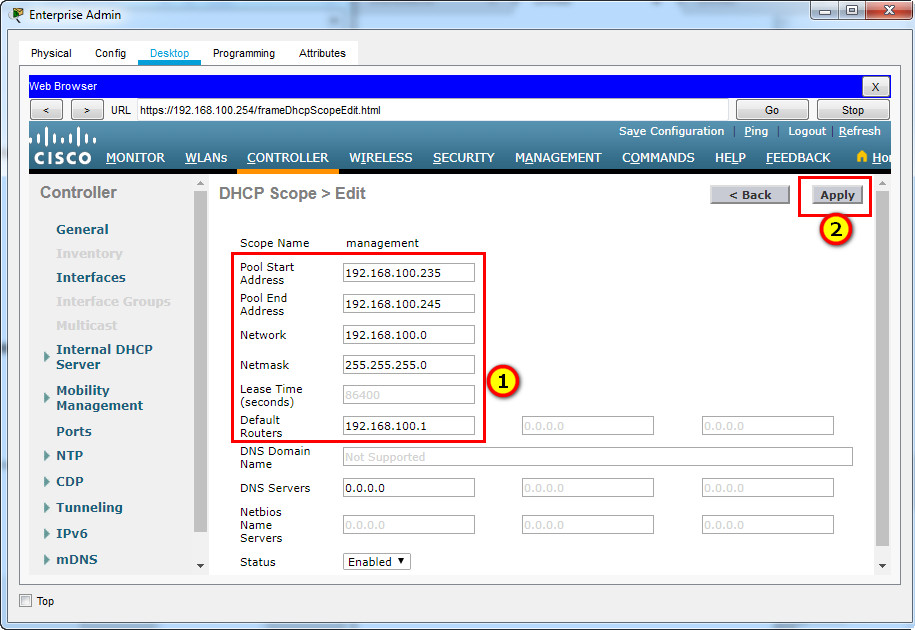 [/tab]
[/tabs]
Step 3: Configure the WLC with external server addresses.
a. Configure the RADIUS server information as follows:
Sever Index: 1
Sever Address: 10.6.0.254
Shared Secret: RadiusPW
[tabs]
[tab title=”Screen 1″] 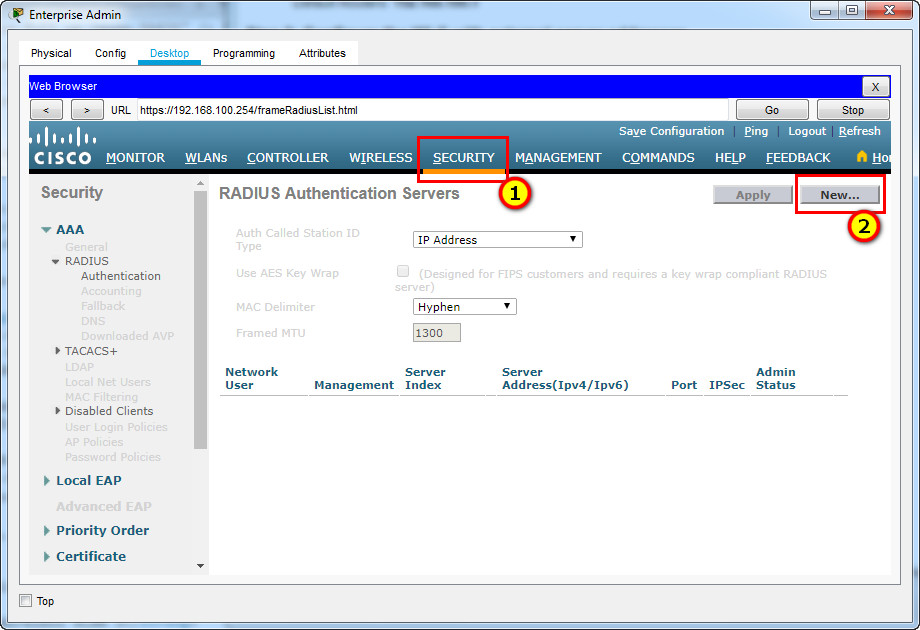 [/tab]
[tab title=”Screen 2″] 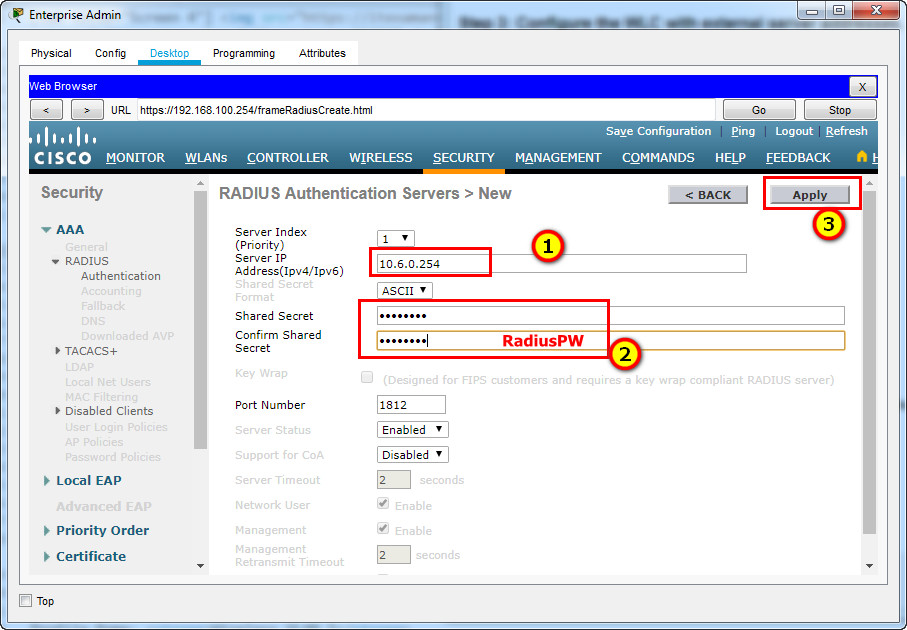 [/tab]
[/tabs]
b. Configure the WLC to send logs information to an SNMP server.
Community Name: WLAN
IP Address: 10.6.0.254
[tabs]
[tab title=”Screen 1″] 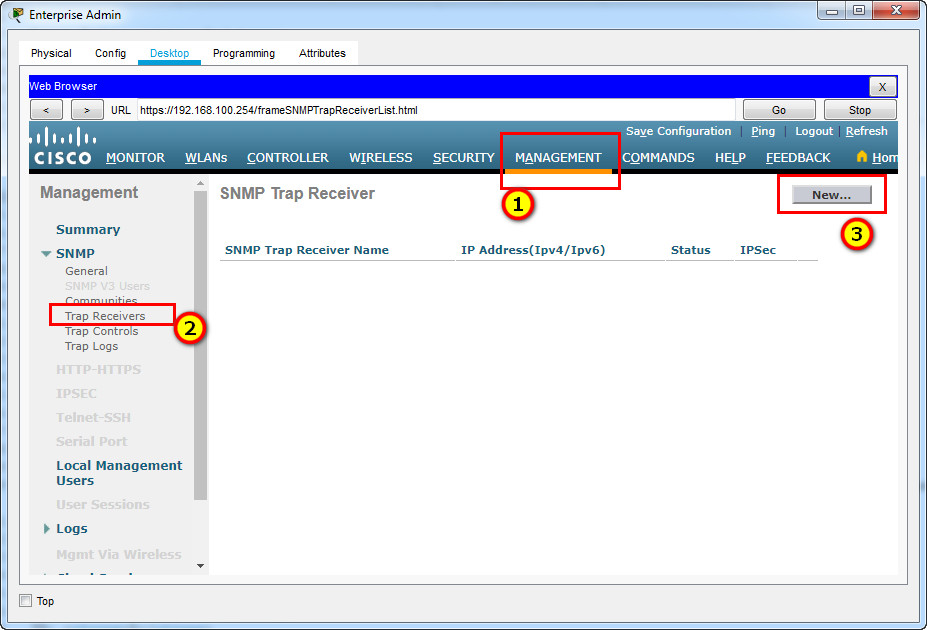 [/tab]
[tab title=”Screen 2″] 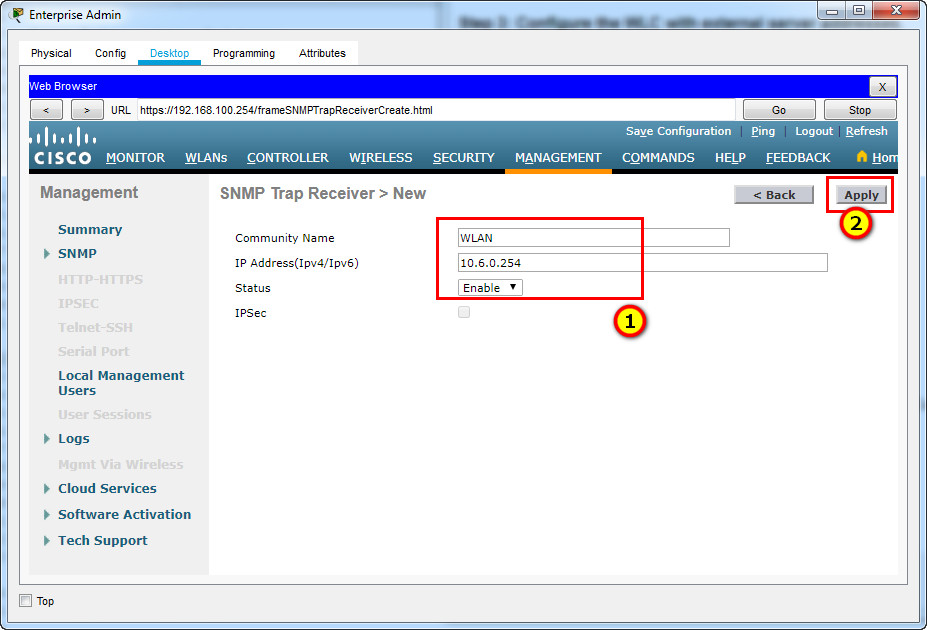 [/tab]
[/tabs]
Step 4: Create the WLANs.
a. Create the first WLAN:
Profile Name: Wireless VLAN 2
WLAN SSID: SSID-2
ID: 2
Interface: WLAN 2
Security: WPA2-PSK
Passphrase: Cisco123
Under the Advanced tab, go to the FlexConnect section. Enable FlexConnect Local Switching and FlexConnect Local Auth.
[tabs]
[tab title=”Screen 1″] 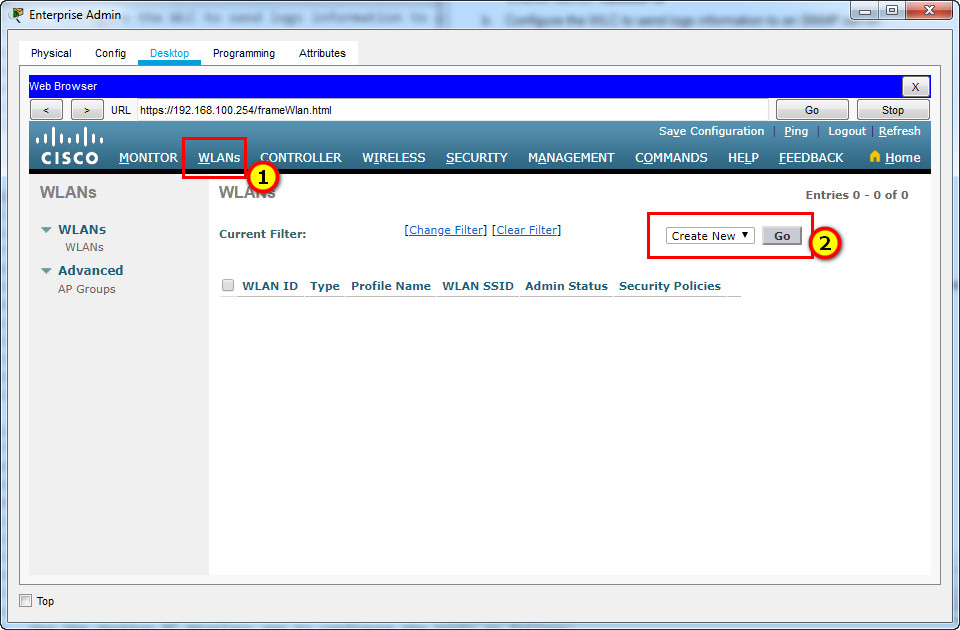 [/tab]
[tab title=”Screen 2″] 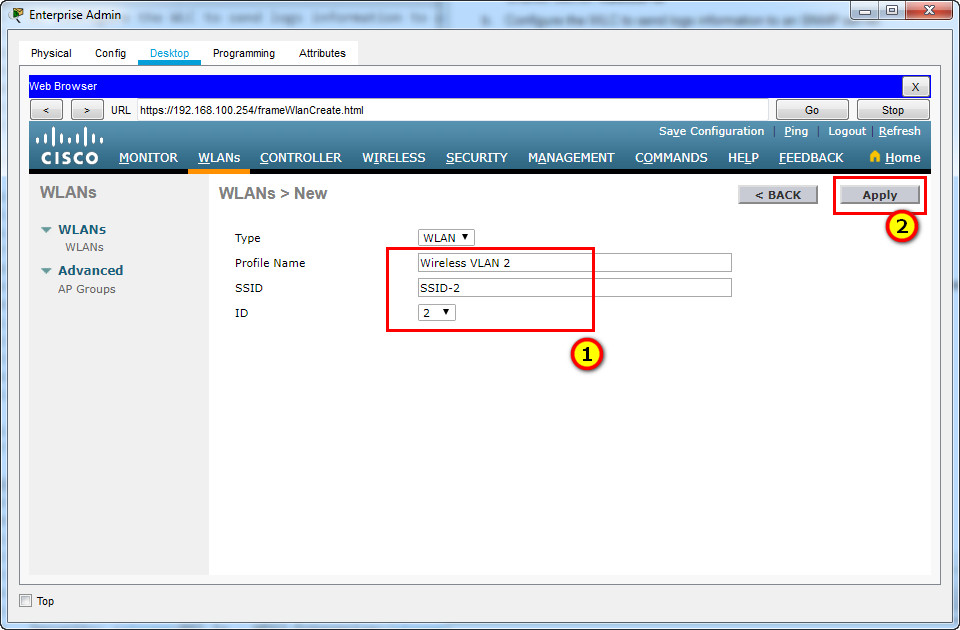 [/tab]
[tab title=”Screen 3″] 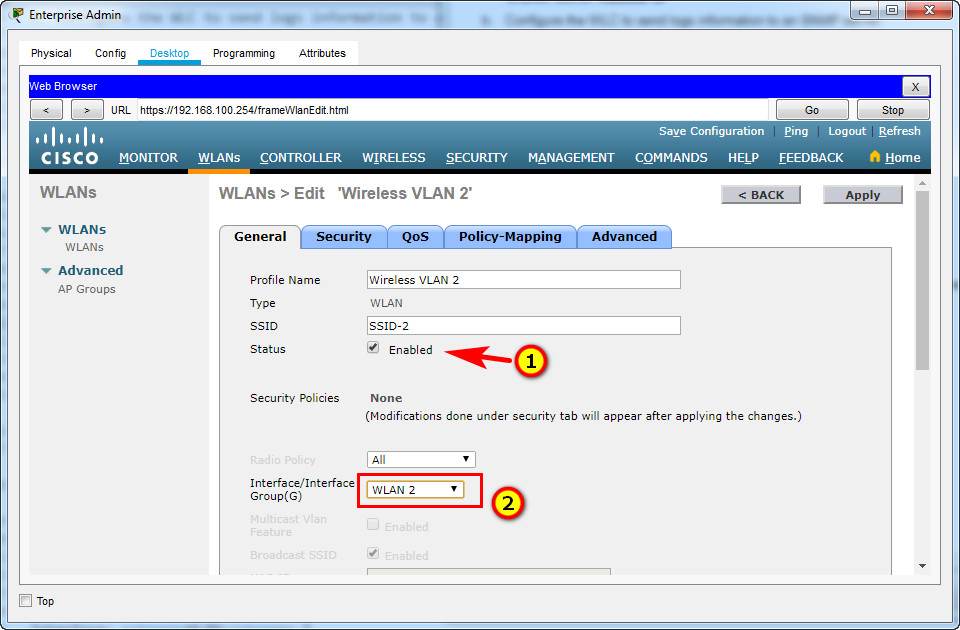 [/tab]
[tab title=”Screen 4″] 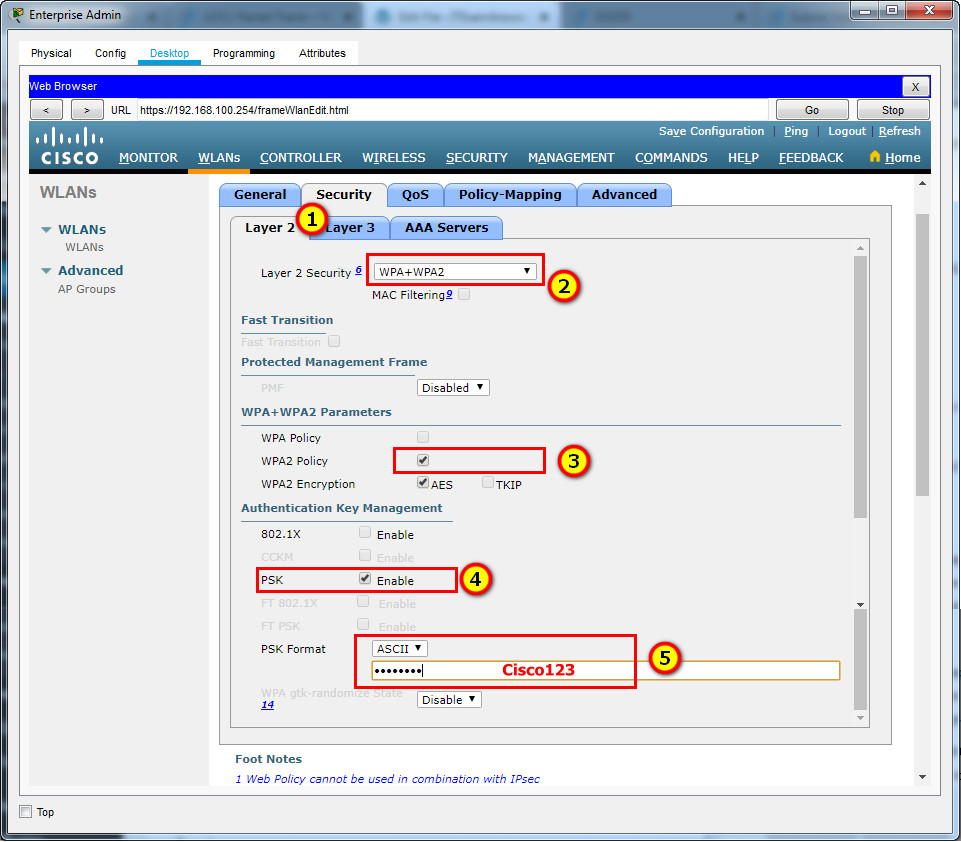 [/tab]
[tab title=”Screen 5″] 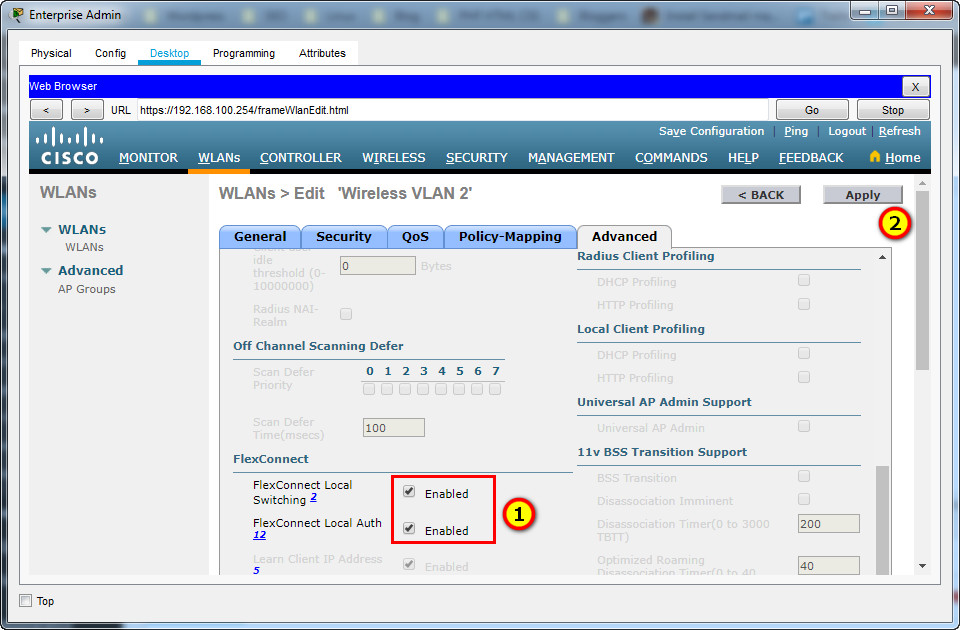 [/tab]
[/tabs]
b. Create the second WLAN:
Profile Name: Wireless VLAN 5
WLAN SSID: SSID-5
Interface: WLAN 5
ID: 5
Security: 802.1x – WPA2-Enterprise
Configure the WLAN to use the RADIUS server for authentication.
Make the FlexConnect settings as was done in Step 4a.
[tabs]
[tab title=”Screen 1″] 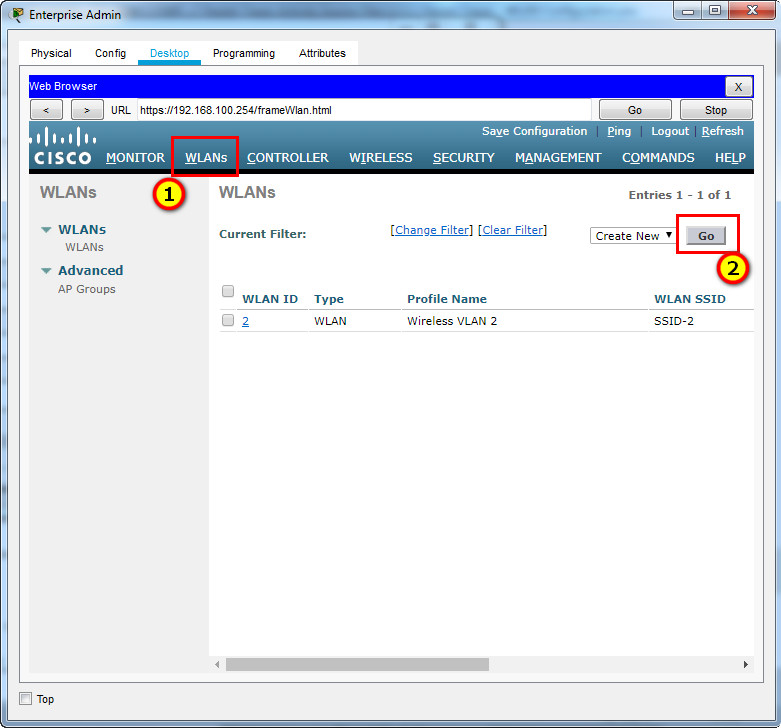 [/tab]
[tab title=”Screen 2″] 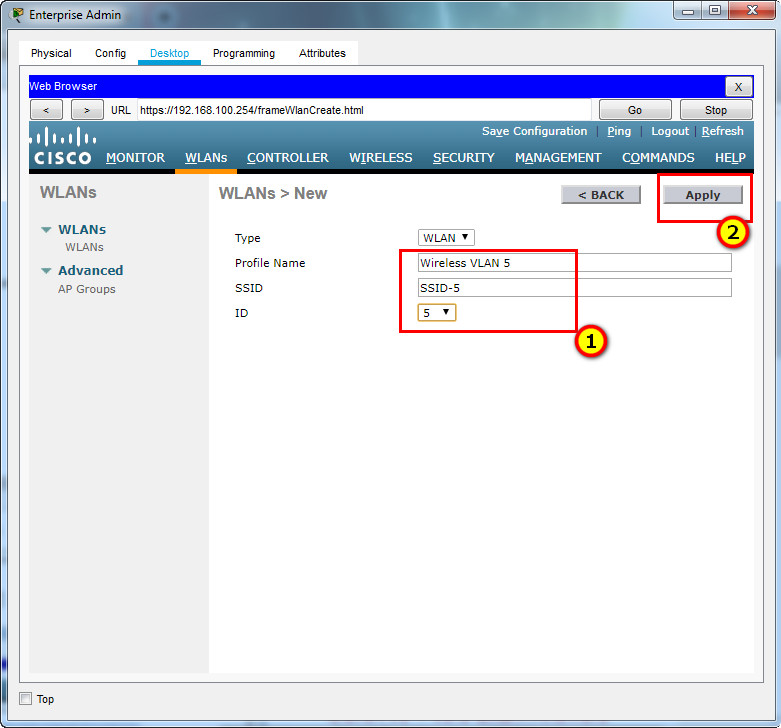 [/tab]
[tab title=”Screen 3″] 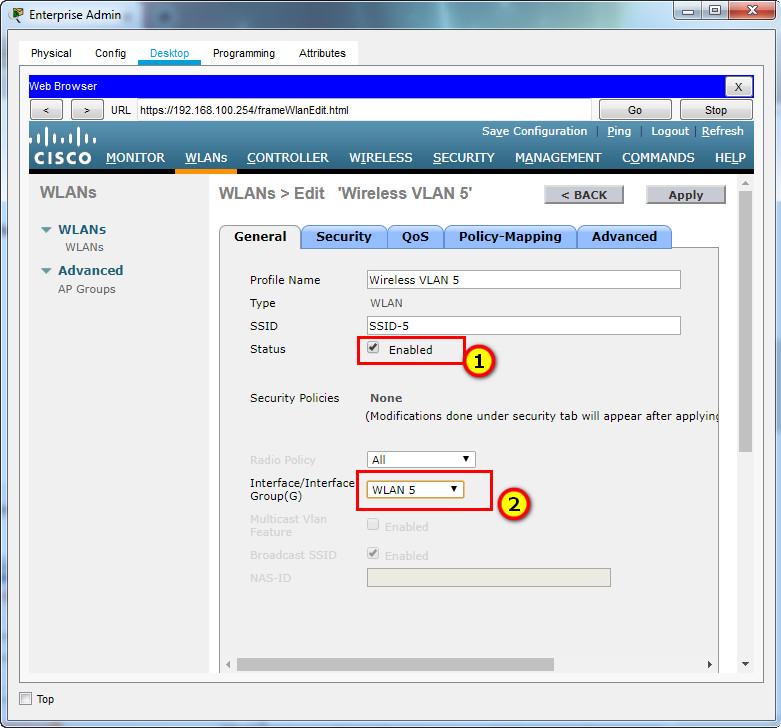 [/tab]
[tab title=”Screen 4″] 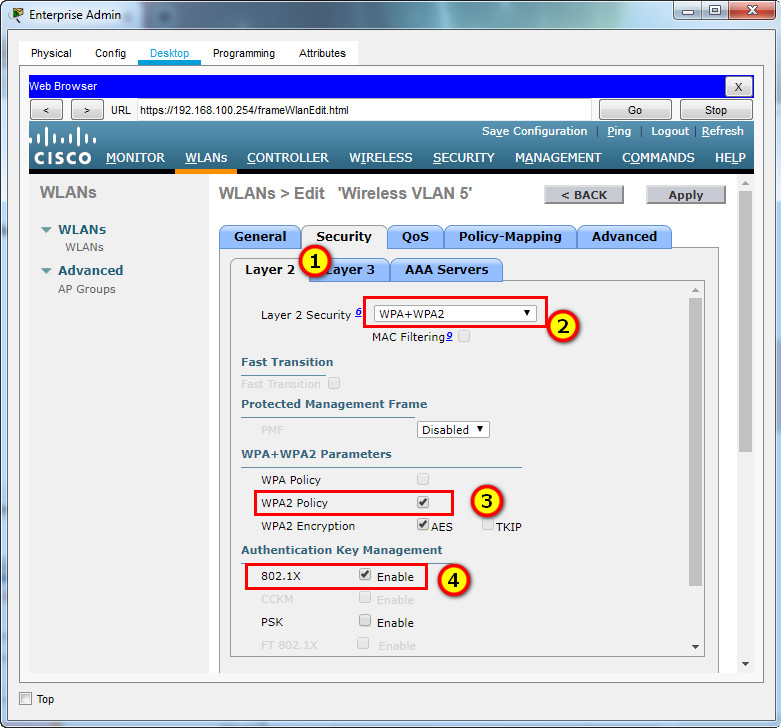 [/tab]
[tab title=”Screen 5″] 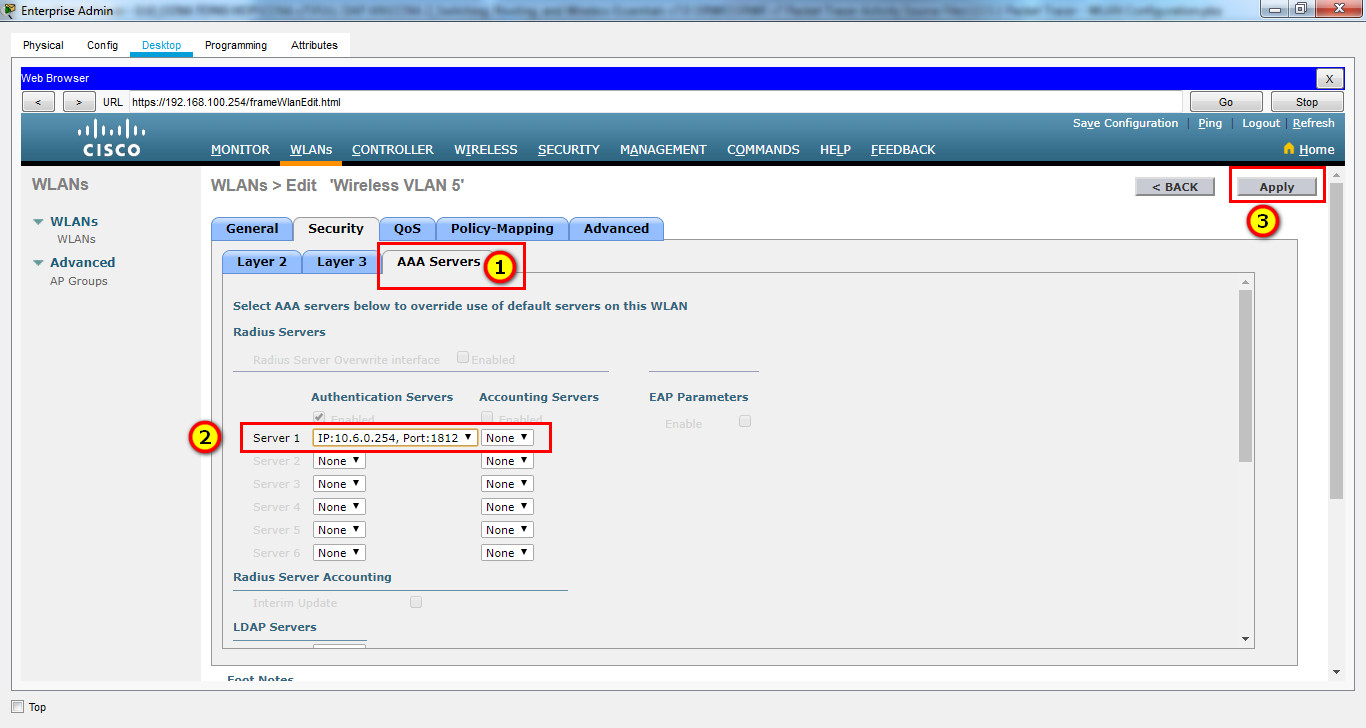 [/tab]
[tab title=”Screen 6″] 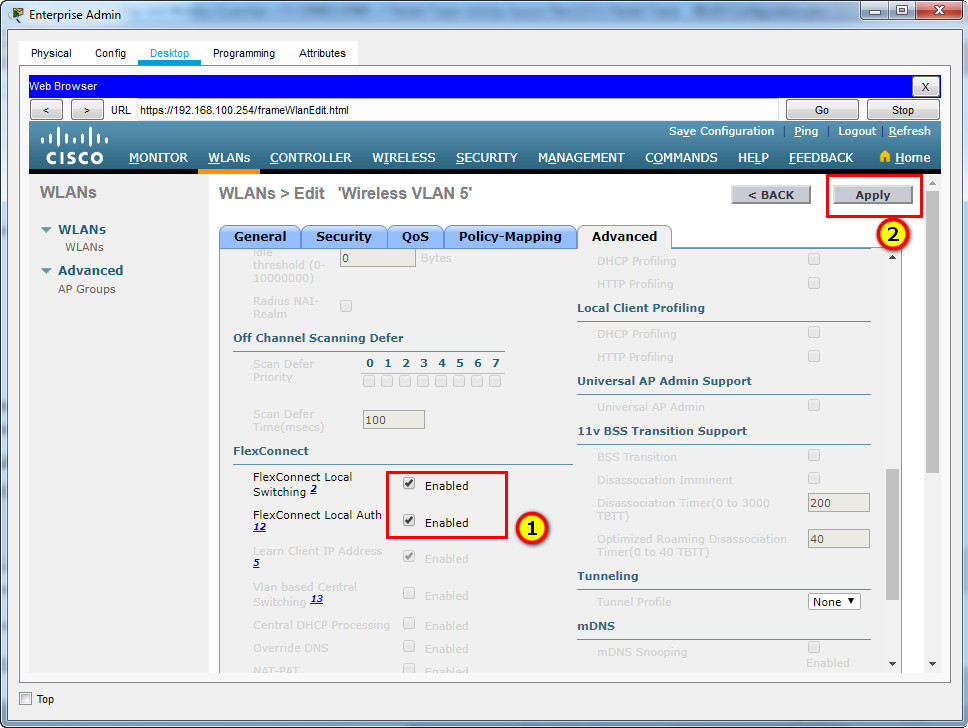 [/tab]
[/tabs]
Step 5: Configure the hosts to connect to the WLANs.
Use the desktop PC Wireless app to configure the hosts as follows:
a. Wireless Host 1 should connect to Wireless VLAN 2.
[tabs]
[tab title=”Screen 1″] 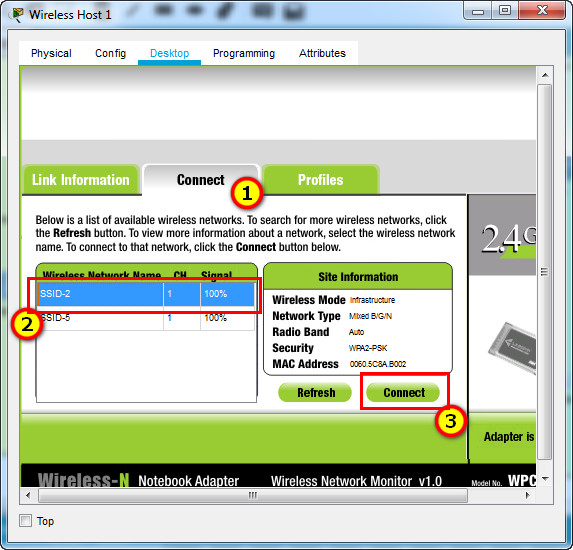 [/tab]
[tab title=”Screen 2″] 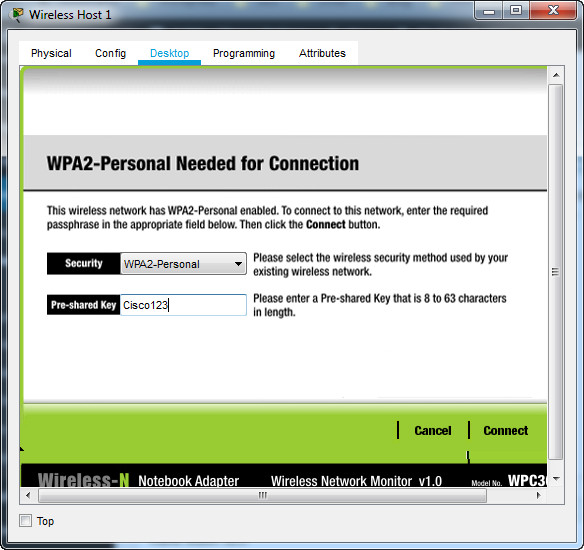 [/tab]
[/tabs]
b. Wireless Host 2 should connect to Wireless VLAN 5 using the credentials in the WLAN information table.
[tabs]
[tab title=”Screen 1″] 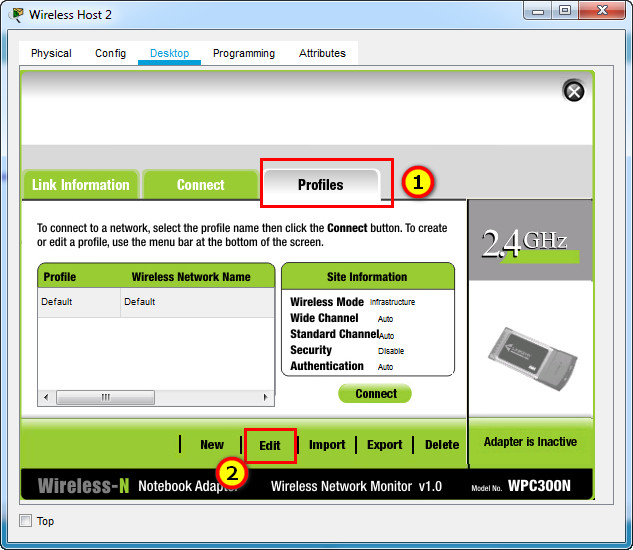 [/tab]
[tab title=”Screen 2″] 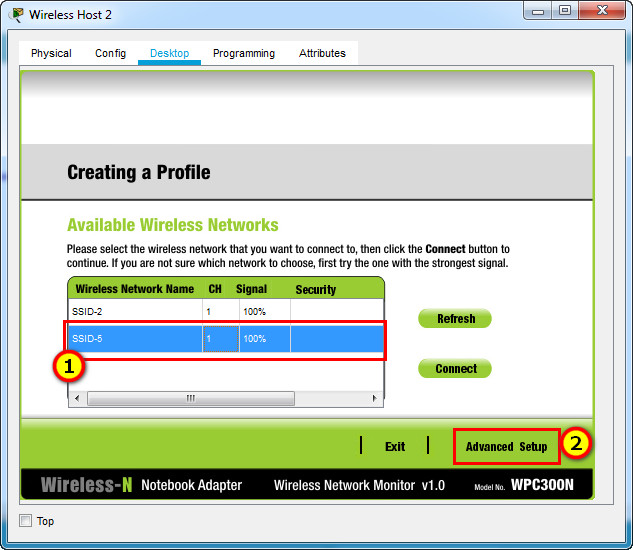 [/tab]
[tab title=”Screen 3″] 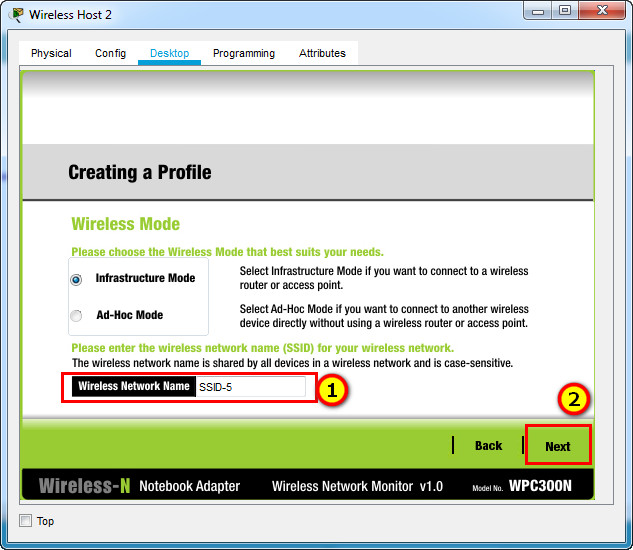 [/tab]
[tab title=”Screen 4″] 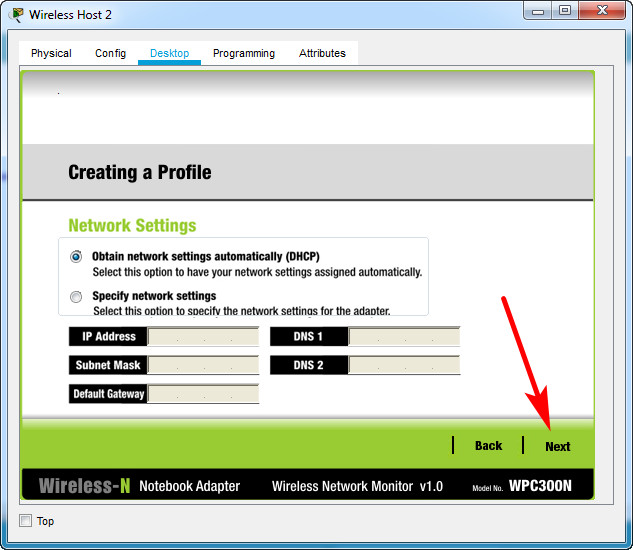 [/tab]
[tab title=”Screen 5″] 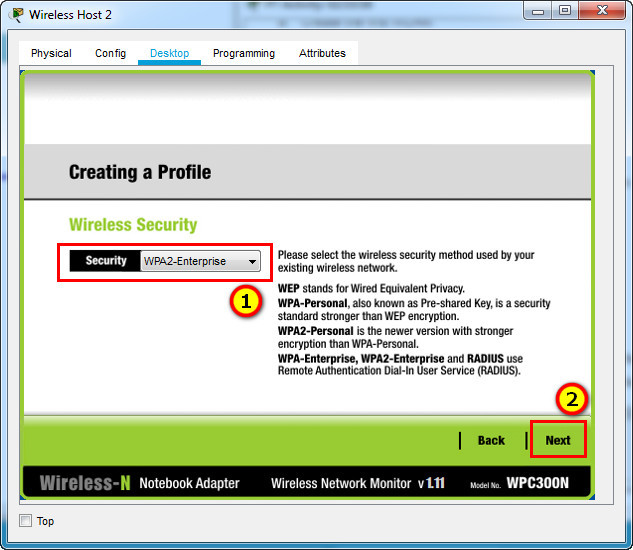 [/tab]
[tab title=”Screen 6″] 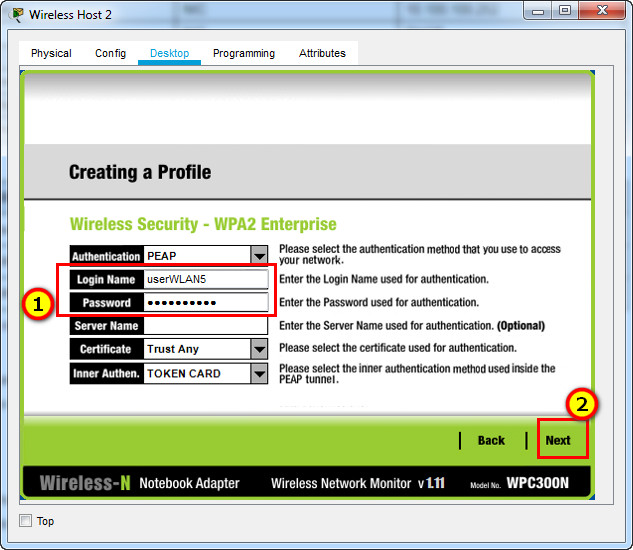 [/tab]
[tab title=”Screen 7″] 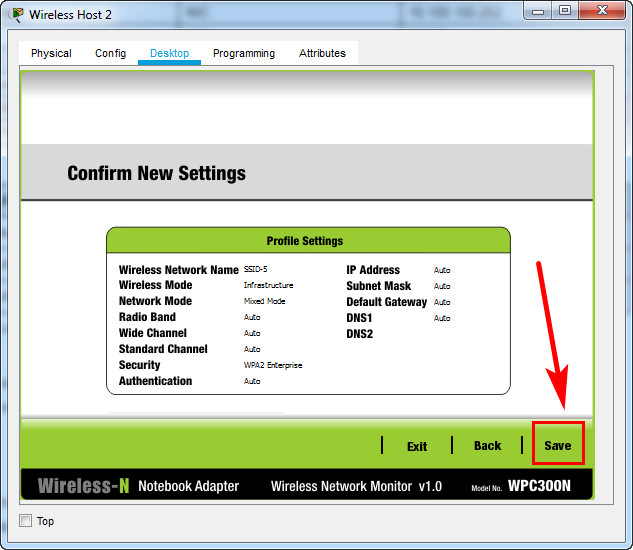 [/tab]
[tab title=”Screen 8″] 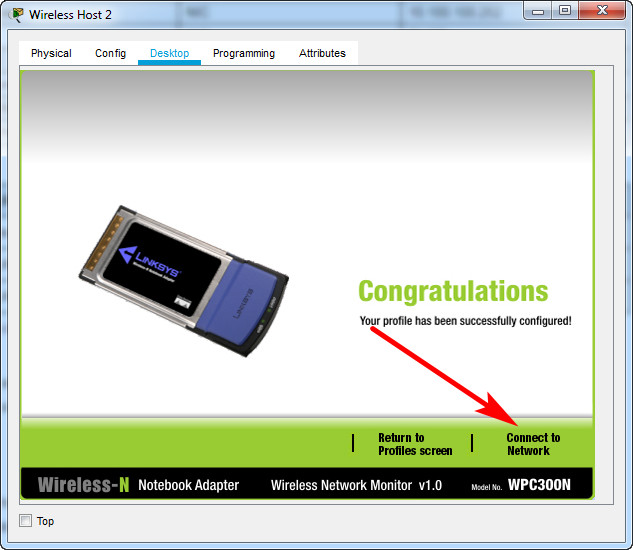 [/tab]
[tab title=”Screen 9″] 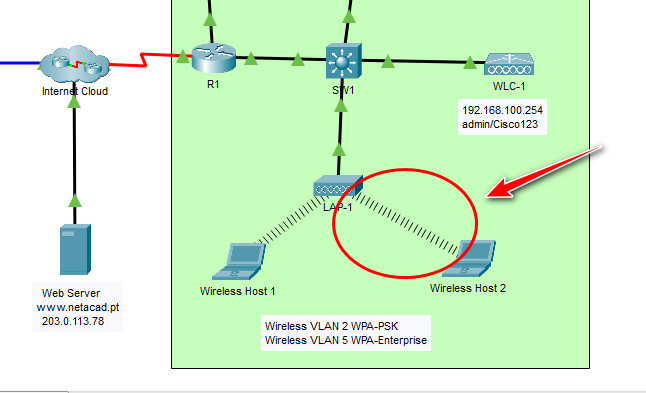 [/tab]
[/tabs]
Step 6: Test connectivity.
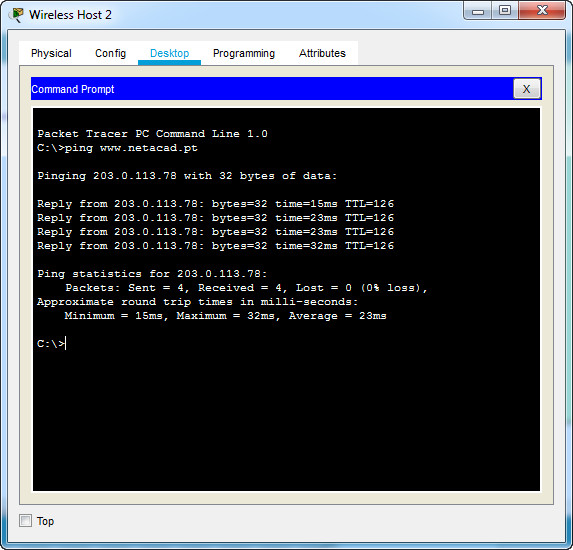
Test connectivity between the wireless hosts and the Web Server by ping and URL.
Download PDF & PKA file completed 100%:
[sociallocker id=”54558″]
[wpdm_package id=’39204′]
[wpdm_package id=’39205′]
[/sociallocker]
[alert-note][one_half]
Previous Lab
13.4.5 Packet Tracer – Troubleshoot WLAN Issues
[/one_half][one_half_last]
Next Lab
14.3.5 Packet Tracer – Basic Router Configuration Review
[/one_half_last][/alert-note]
