2.3.11 Packet Tracer – Determine the DR and BDR (Instructor Version)
Instructor Note: Red font color or green highlights indicate text that appears in the instructor copy only.

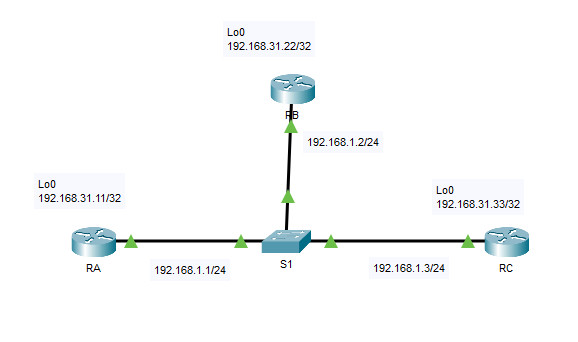
Addressing Table
| Device | Interface | IP Address | Subnet Mask |
|---|---|---|---|
| RA | G0/0 | 192.168.1.1 | 255.255.255.0 |
| Lo0 | 192.168.31.11 | 255.255.255.255 | |
| RB | G0/0 | 192.168.1.2 | 255.255.255.0 |
| Lo0 | 192.168.31.22 | 255.255.255.255 | |
| RC | G0/0 | 192.168.1.3 | 255.255.255.0 |
| Lo0 | 192.168.31.33 | 255.255.255.255 |
Objectives
- Part 1: Examine DR and BDR Changing Roles
- Part 2: Modify OSPF Priority and Force Elections
Scenario
In this activity, you will examine DR and BDR roles and watch the roles change when there is a change in the network. You will then modify the priority to control the roles and force a new election. Finally, you will verify routers are filling the desired roles.
Instructions
Part 1: Examine DR and BDR Changing Roles
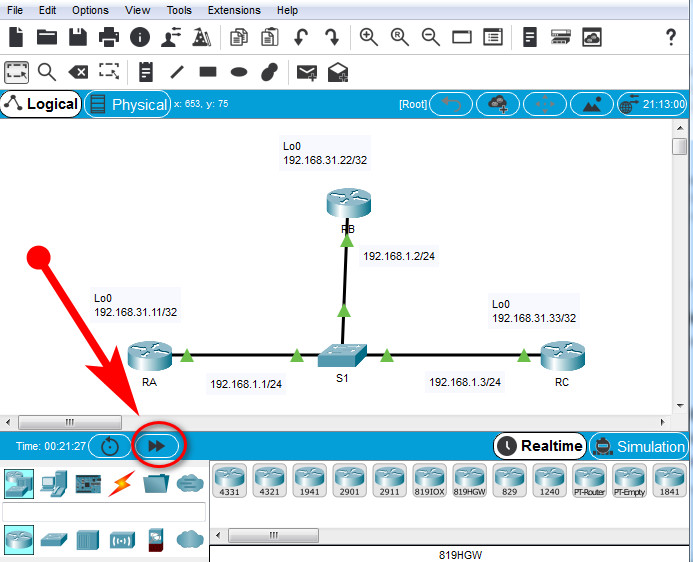
Step 1: Wait until the amber link lights turn green.
When you first open the file in Packet Tracer, you may notice that the link lights for the switch are amber. These link lights will stay amber for 50 seconds while the STP protocol on the switch makes sure that one of the routers is not another switch. Alternatively, you can click Fast Forward Time to bypass this process.

Step 2: Verify the current OSPF neighbor states.
Use the appropriate command on each router to examine the current DR and BDR. If a router shows FULL/DROTHER it means that the router is not a DR or a BDR.
RA# show ip ospf neighbor

Neighbor ID     Pri   State           Dead Time   Address         Interface
192.168.31.33     2   FULL/DR         00:00:35    192.168.1.3     GigabitEthernet0/0
192.168.31.22     1   FULL/BDR        00:00:35    192.168.1.2     GigabitEthernet0/0

RB# show ip ospf neighbor
Neighbor ID     Pri   State           Dead Time   Address         Interface
192.168.31.11     1   FULL/DROTHER    00:00:36    192.168.1.1     GigabitEthernet0/0
192.168.31.33     2   FULL/DR         00:00:36    192.168.1.3     GigabitEthernet0/0

RC# show ip ospf neighbor

Neighbor ID     Pri   State           Dead Time   Address         Interface
192.168.31.11     1   FULL/DROTHER    00:00:39    192.168.1.1     GigabitEthernet0/0
192.168.31.22     1   FULL/BDR        00:00:38    192.168.1.2     GigabitEthernet0/0
Which router is the DR?
Which router is the BDR?
What is the OSPF state of router RA?
Step 3: Turn on IP OSPF adjacency debugging.
You can monitor the DR and BDR election process with a debug command. On RA and RB, enter the following command.
RA# debug ip ospf adj
RB# debug ip ospf adj
Step 4: Disable the Gigabit Ethernet 0/0 interface on RC.
a. Use the shutdown command to disable the link between RC and the switch to cause roles to change.
RC(config) #interface g0/0
RC(config-if) #shutdown
b. Wait about 30 seconds for the dead timers to expire on RA and RB.
According to the debug output, which router was elected DR and which router was elected BDR?
[tabs]
[tab title=”RA”]
[/tab]
[tab title=”RB”]
[/tab]
[/tabs]
Step 5: Restore the Gigabit Ethernet 0/0 interface on RC.
a. Re-enable the link between RC and the switch.
RC(config) #interface g0/0
RC(config-if) #no shutdown
b. Wait for the new DR/BDR elections to occur.
Did DR and BDR roles change? Explain.
c. Verify the DR and BDR assignments using the show ip ospf neighbor command on router RC.
RC# show ip ospf neighbor
Neighbor ID     Pri   State           Dead Time   Address         Interface
192.168.31.22     1   FULL/DR         00:00:34    192.168.1.2     GigabitEthernet0/0
192.168.31.11     1   FULL/BDR        00:00:34    192.168.1.1     GigabitEthernet0/0
Note: if the show ip ospf neighbor command does not return RB as the DR and RA as the BDR, turn off debugging on RA and RB with the undebug all command and retry steps 4 and 5.
Step 6: Disable the GigabitEthernet0/0 interface on RB.
a. Disable the link between RB and the switch to cause roles to change.
b. Wait about 30 seconds for the holddown timers to expire on RA and RC.
According to the debug output on RA, which router was elected DR and which router was elected BDR?
Step 7: Restore the GigabitEthernet0/0 interface on RB.
a. Re-enable the link between RB and the switch.
Wait for the new DR/BDR elections to occur. Did DR and BDR roles change? Explain.
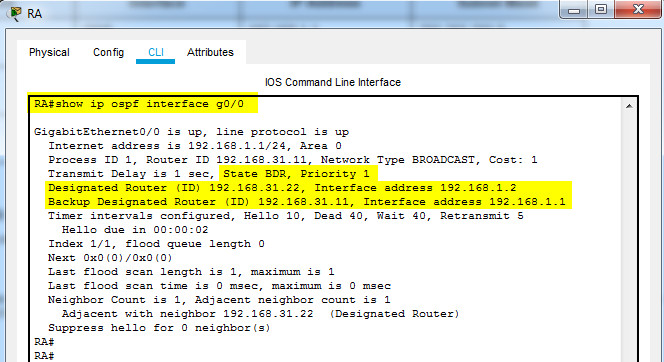
b. Use the show ip ospf interface command on router RC.
What is the status of router RC now?
Step 8: Turn off Debugging.
Enter the command undebug all on RA and RB to disable debugging.
Part 2: Modify OSPF Priority and Force Elections
Step 1: Configure OSPF priorities on each router.
a. To change the DR and BDR, use the ip ospf priority command to configure the GigabitEthernet 0/0 port of each router with the following OSPF interface priorities:
- RA: 200
- RB: 100
- RC: 1 (This is the default priority)
RA(config)# interface g0/0
RA(config-if)# ip ospf priority 200
b. Set the priority on router RB and RC.
RB(config)# interface g0/0
RB(config-if)# ip ospf priority 100

RC(config)# interface g0/0
RC(config-if)# ip ospf priority 1
Step 2: Force an election by resetting the OSPF process on the routers.
Starting with router RA, issue the clear ip ospf process on each router to reset the OSPF process.
Step 3: Verify DR and BDR elections were successful.
Wait long enough for OSPF to converge and for the DR/BDR election to occur. This should take a few minutes. You can click Fast Forward Time to speed up the process.
According to output from the show ip ospf neighbor command on the routers, which router is now DR and which router is now BDR?
Note: If the routers do not elect the correct DR and BDR after setting the OSPF priorities try restarting Packet Tracer.
Download Packet Tracer Completed File
[sociallocker id=”54558″]
[wpdm_package id=’55870′]
[wpdm_package id=’55359′][/sociallocker]
[alert-note][one_half]
Previous Lab
2.2.13 Packet Tracer – Point-to-Point Single-Area OSPFv2 Configuration
[/one_half][one_half_last]
Next Lab
2.4.11 Packet Tracer – Modify Single-Area OSPFv2
[/one_half_last][/alert-note]
