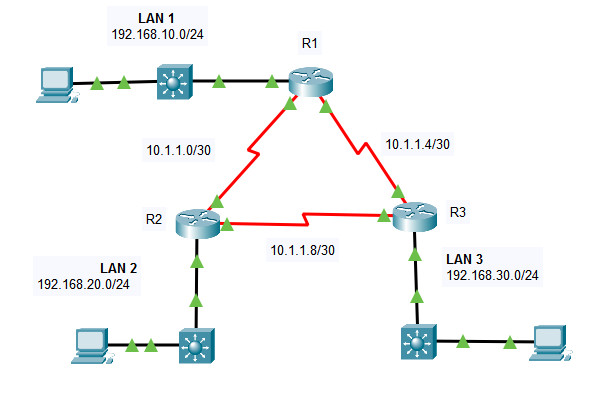
2.2.13 Packet Tracer – Point-to-Point Single-Area OSPFv2 Configuration (Instructor Version)
Instructor Note: Red font color or green highlights indicate text that appears in the instructor copy only.
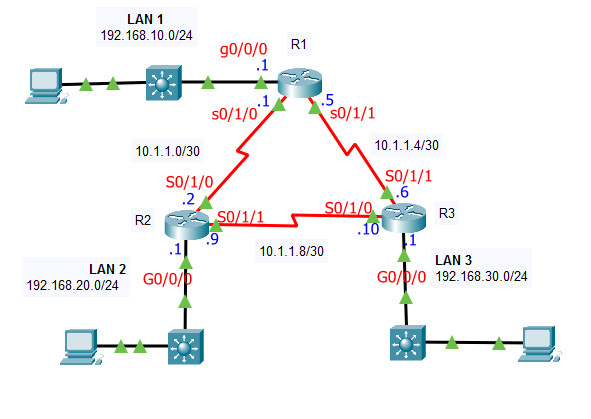
Addressing Table
| Device | Interface | IP Address | Subnet Mask |
|---|---|---|---|
| R1 | G0/0/0 | 192.168.10.1 | /24 |
| S0/1/0 | 10.1.1.1 | /30 | |
| S0/1/1 | 10.1.1.5 | /30 | |
| R2 | G0/0/0 | 192.168.20.1 | /24 |
| S0/1/0 | 10.1.1.2 | /30 | |
| S0/1/1 | 10.1.1.9 | /30 | |
| R3 | G0/0/0 | 192.168.30.1 | /24 |
| S0/1/0 | 10.1.1.10 | /30 | |
| S0/1/1 | 10.1.1.6 | /30 | |
| PC1 | NIC | 192.168.10.10 | /24 |
| PC2 | NIC | 192.168.20.10 | /24 |
| PC3 | NIC | 192.168.30.10 | /24 |
Objectives
- Part 1: Configure Router IDs.
- Part 2: Configure Networks for OSPF Routing.
- Part 3: Configure Passive Interfaces.
- Part 4: Verify OSPF configuration.
Background
In this activity, you will activate OSPF routing using network statements and wildcard masks, configuring OSPF routing on interfaces, and by using network statements quad-zero masks. In addition, you will configure explicit router IDs and passive interfaces.
Instructions
Part 1: Configure router IDs.
a. Start the OSPF routing process on all three routers. Use process ID 10.
Open configuration window
Router(config)# router ospf process-id
b. Use the router-id command to set the OSPF IDs of the three routers as follows
• R1: 1.1.1.1
• R2: 2.2.2.2
• R3: 3.3.3.3
Use the following command:
Router(config-router)# router-id rid
R1(config)# router ospf 10
R1(config-router)# router-id 1.1.1.1

R2(config)# router ospf 10
R2(config-router)# router-id 2.2.2.2

R3(config)# router ospf 10
R3(config-router)# router-id 3.3.3.3
Close configuration window
Part 2: Configure Networks for OSPF Routing
Step 1: Configure networks for OSPF routing using network commands and wildcard masks.
How many statements are required to configure OSPF to route all the networks attached to router R1?
The LAN attached to router R1 has a /24 mask. What is the equivalent of this mask in dotted decimal representation?
Subtract the dotted decimal subnet mask from 255.255.255.255. What is the result?
What is the dotted decimal equivalent of the /30 subnet mask?
Subtract the dotted decimal representation of the /30 mask from 255.255.255.255. What is the result?
a. Configure the routing process on R1 with the network statements and wildcard masks that are required to activate OSPF routing for all the attached networks. The network statement values should be the network or subnet addresses of the configured networks.
Router(config-router)# network network-address wildcard-mask area area-id
b. Verify that OSPF has been configured properly by the displaying the running configuration. If you find an error, delete the network statement using the no command and reconfigure it.
R1(config-router)# network 192.168.10.0 0.0.0.255 area 0
R1(config-router)# network 10.1.1.0 0.0.0.3 area 0
R1(config-router)# network 10.1.1.4 0.0.0.3 area 0
Step 2: Configure networks for OSPF routing using interface IP addresses and quad-zero masks.
On router R2, configure OSPF using network commands with the IP addresses of the interfaces and quad-zero masks. The syntax of the network command is the same as was used above.
R2(config-router)# network 192.168.20.1 0.0.0.0 area 0
R2(config-router)# network 10.1.1.2 0.0.0.0 area 0
R2(config-router)# network 10.1.1.9 0.0.0.0 area 0
Step 3: Configure OSPF routing on router interfaces
On router R3, configure the required interfaces with OSPF.
Question:
Which interfaces on R3 should be configured with OSPF?
Configure each interface using the command syntax shown below:
Router(config-if)# ip ospf process-id area area-id
R3(config)# interface GigabitEthernet0/0/0
R3(config-if)# ip ospf 10 area 0
R3(config-if)# interface Serial0/1/0
R3(config-if)# ip ospf 10 area 0
R3(config-if)# interface Serial0/1/1
R3(config-if)# ip ospf 10 area 0
Close configuration window
Part 3: Configure Passive Interfaces
OSPF will send its protocol traffic out of all interfaces that are participating in the OSPF process. On links that are not configured to other networks, such as LANs, this unnecessary traffic consumes resources. The passive-interface command will prevent the OSPF process from sending unnecessary routing protocol traffic out LAN interfaces.
Question:
Which interfaces on R1, R2, and R3 are a LAN interfaces?
Configure the OSPF process on each of the three routers with the passive-interface command.
Open configuration window
Router(config-router)# passive-interface interface
R1(config)# router ospf 10
R1(config-router)# passive-interface GigabitEthernet0/0/0

R2(config)# router ospf 10
R2(config-router)# passive-interface GigabitEthernet0/0/0

R3(config)# router ospf 10
R3(config-router)# passive-interface GigabitEthernet0/0/0
Close configuration window
Part 4: Verify OSPF Configuration
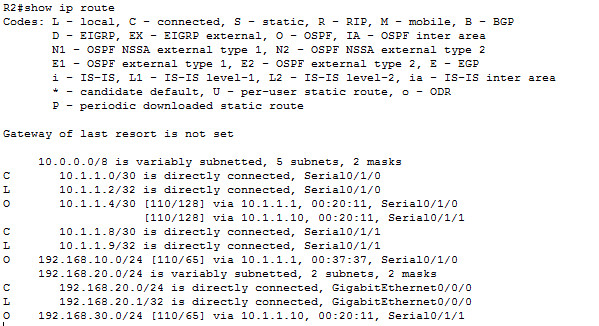
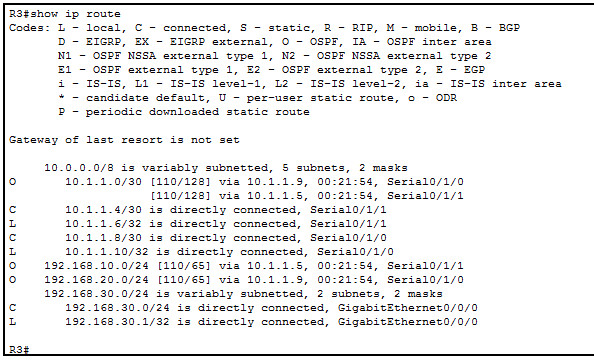
Use show commands to verify the network and passive interface configuration of the OSPF process on each router.
Verify OSPF

[tabs]
[tab title=”R1″] 
[/tab]
[tab title=”R2″]
[/tab]
[tab title=”R3″] 
[/tab]
[/tabs]
Verify passive interface

Answer Scripts
Router R1
enable
configure terminal
router ospf 10
 router-id 1.1.1.1
 network 192.168.10.0 0.0.0.255 area 0
 network 10.1.1.0 0.0.0.3 area 0
 network 10.1.1.4 0.0.0.3 area 0
 passive-interface g0/0/0
end
Router R2
enable
configure terminal
router ospf 10
 router-id 2.2.2.2
 network 192.168.20.1 0.0.0.0 area 0
 network 10.1.1.2 0.0.0.0 area 0
 network 10.1.1.9 0.0.0.0 area 0
 passive-interface g0/0/0
end
Router R3
enable
configure terminal
router ospf 10
 router-id 3.3.3.3
interface GigabitEthernet0/0/0
 ip ospf 10 area 0
interface Serial0/1/0
 ip ospf 10 area 0
interface Serial0/1/1
 ip ospf 10 area 0
router ospf 10
 passive-interface g0/0/0
end
Download Packet Tracer Completed File
[sociallocker id=”54558″]
[wpdm_package id=’55868′]
[wpdm_package id=’55352′]
[/sociallocker]
[alert-note][one_half]
[/one_half][one_half_last]
Next Lab
2.3.11 Packet Tracer – Determine the DR and BDR
[/one_half_last][/alert-note]
